Turret with object identification
A smart turret using a Raspberry Pi Pico 2W, with servo control, ultrasonic object detection and live radar
Author: Purcarescu Eduard-Gabriel
GitHub Project Link : https://github.com/UPB-PMRust-Students/project-EduarditoRealG
Youtube Project Link : https://youtu.be/9hobQLP9Fqw
Description
The project uses an ultrasonic sensor to help the user see the objects within a certain radius on a display and if an object is closer than a set distance, it uses a servomotor to shoot it. Another servo is used to constantly rotate the turret. After shooting, it stops and waits for a button to be pressed in order to reset.
Motivation
Since I was little, I've always liked shooting games and I can say I wanted to do this project in order to remember my childhood and also something in order to gain more knowledge in software and hardware domain. I didn't like the games which didn't have a radar or a minimap, that is why I integrated also the lcd display.
Architecture
- Raspberry Pi Pico 2W: the brain of the operation. It receives information from the sensor and analyses what to send to the display and servomotor
- Micro servomotor: shooting function
- Metallic servomotor: used for automatic rotation of the turret
- Ultrasonic sensor: measures the distance to an object and then sends it to the microcontroller
- LCD display: displays objects seen by the ultrasonic sensor, behaving like a mini radar
- Push button: serves as a reset function after an object has been shot
- Breadboard: interconnects all the pieces

Log
Week 28 April - 4 May
Started working on the documentation for the project. I bought every necessary component and started to connect them on the breadboard, in order to be able to make the schematics and understand how they interact with eachother.
Week 5-11 May
I began assembling all the components. I started also to look into the programming part, what features need to be implemented and I also 3D printed the structure.
Week 12-18 May
The exterior design is finished and fully assembled. I continue making progress with the software milestone in order to interconnect all the parts' functions.
Week 19-25 May
The software part of the project is finished. The project is fully functional!
Hardware
- Raspberry Pi Pico 2W
- Micro servomotor
- Micro servomotor
- Ultrasonic sensor
- LCD display
- Push button
- Jumper wires
- Breadboard
- Resistors
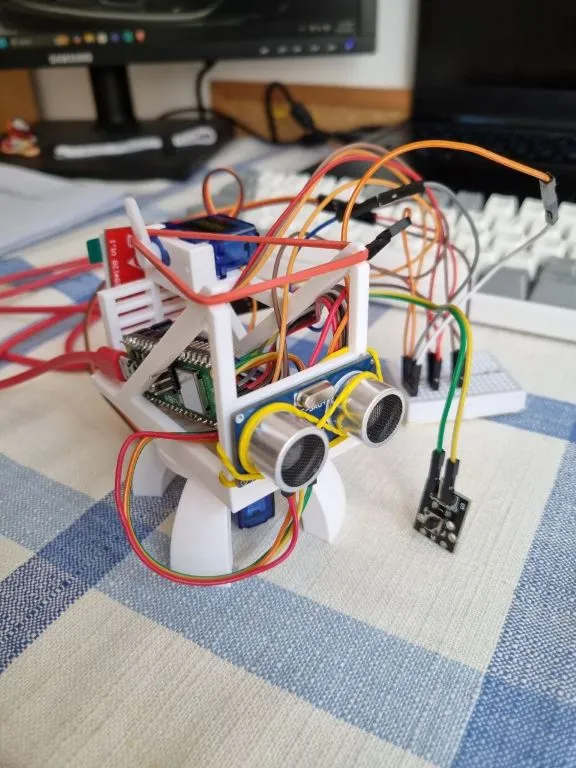
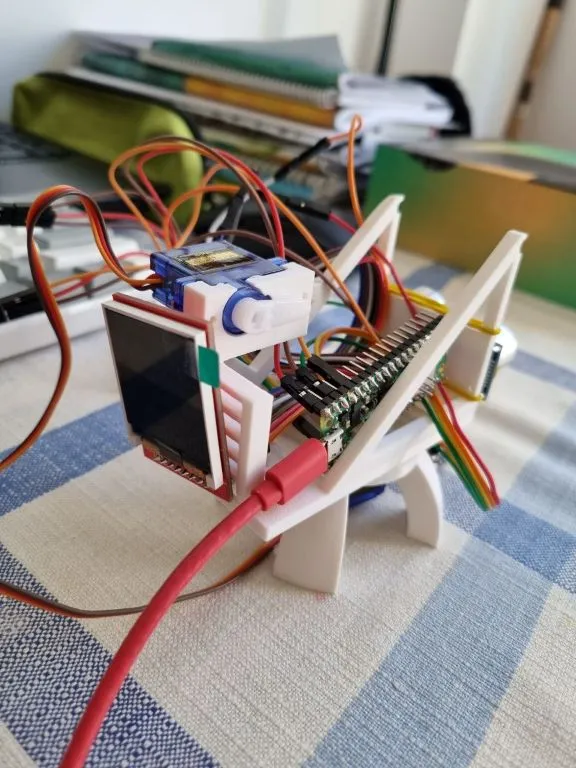
Schematics
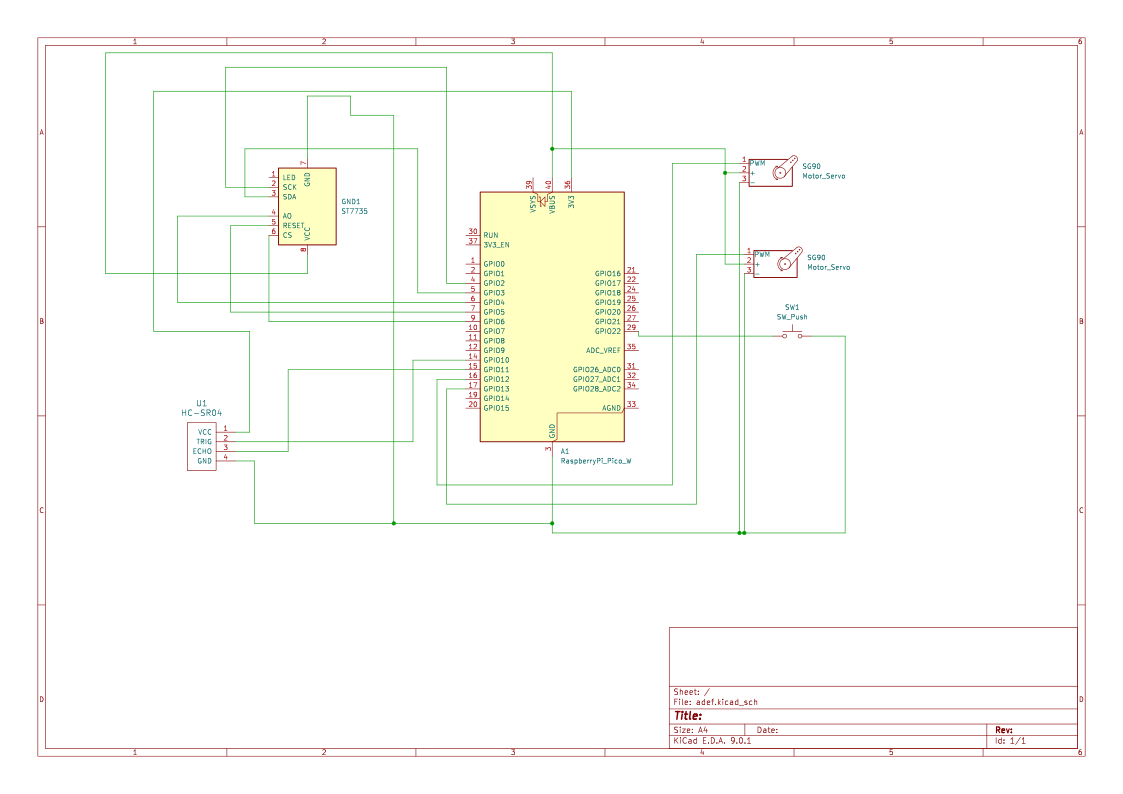
Bill of Materials
| Device | Usage | Price |
|---|---|---|
| Raspberry Pi Pico 2W | The microcontroller | 40 RON |
| Debug probe | Debug | 66 RON |
| SG90 | Servomotor | 12 RON |
| SG90 | Servomotor | 12 RON |
| Breadboard | Breadboard | 10 RON |
| 1.44' LCD dislay | Display | 28 RON |
| Jumper wires | Wiring | 5 RON |
| Push button | Reset button | 0.36 RON |
Software
| Library | Description | Usage |
|---|---|---|
| embassy-rp | Pico Peripherals | Accesses Raspberry Pi Pico W hardware like GPIO, PWM, and SPI |
| embassy-executor | Async Runtime | Runs async tasks on embedded systems |
| embassy-time | Time Management Library | Used for timers, delays, and async time operations |
| embedded-hal | Hardware Abstraction Layer | Defines traits for embedded device interfaces like SPI, PWM, and GPIO |
| embedded-graphics | Graphics Primitives Library | Used to draw text, shapes, and images on embedded displays |
| st7735-lcd | Display Driver | Used to control ST7735 1.44" LCD over SPI |
| display-interface-spi | SPI Display Interface | Provides SPI interface support for embedded display drivers |
| defmt | Debug Formatter | Efficient logging and debug output for embedded systems |
| defmt-rtt | RTT Transport for defmt | Sends defmt logs over USB using Real-Time Transfer |
| panic-probe | Panic Handler | Displays panic messages via defmt for debugging |
| hcsr04_async | Ultrasonic sensor | Measures distance |
| micromath | Math crate | Used for trigonometric functions |
Links
https://pico.implrust.com/ultrasonic/index.html https://www.raspberrypi.com/documentation/ https://pmrust.pages.upb.ro/docs/fils_en/welcome