Project Name
Guitar Tuner
Author: Alexandra Rus
GitHub Project Link: https://github.com/UPB-PMRust-Students/project-Aleczx23
Description
Tuning a guitar can often be a tedious task, especially when relying on manual methods or a clip-on tuner. For this project, the goal is to create an automatic guitar tuner that simplifies the process, making it more accurate and efsficient. . Using a microphone, the system captures the sound of the guitar strings and analyzes their frequencies. It then compares them to the correct pitch and provides feedback to the player, indicating whether the string is in tune or needs adjustment. An additional improvement that I would hope to achieve is to make it adjust the tension automatically using an attached stepper motor for tuning pegs. This project blends the tactile experience of traditional guitar playing with modern technology, offering a faster and more precise way to tune your guitar.
Motivation
Ever since I was a kid I had this deep love and passion for music, any type of it and I've always wanted a guitar. Soit felt natural that during highschool my top choices were rock, blues and folk music. My parents didn't really encourage this passion of mine, so I started taking lessons only this year, after I spent some time convincing myself that it is better late than never, so, when I thought about this project it felt just right to combine these to passions of mine. Especially that, as a beginner. it felt impossibile to understand how can I tune my guitar without any help. There was a really quick way to solve it, using one of the many apps you can find online. But that, like every question I have regarding technology, it made me think, "How does it work?". So, this is my opportunity to find out how can I do my own guitar tuner, using a raspberry pi, and what is the preocess behind it, I am really eager to achieve it, and maybe even improve it to make it tune my guitar by itself.
Architecture
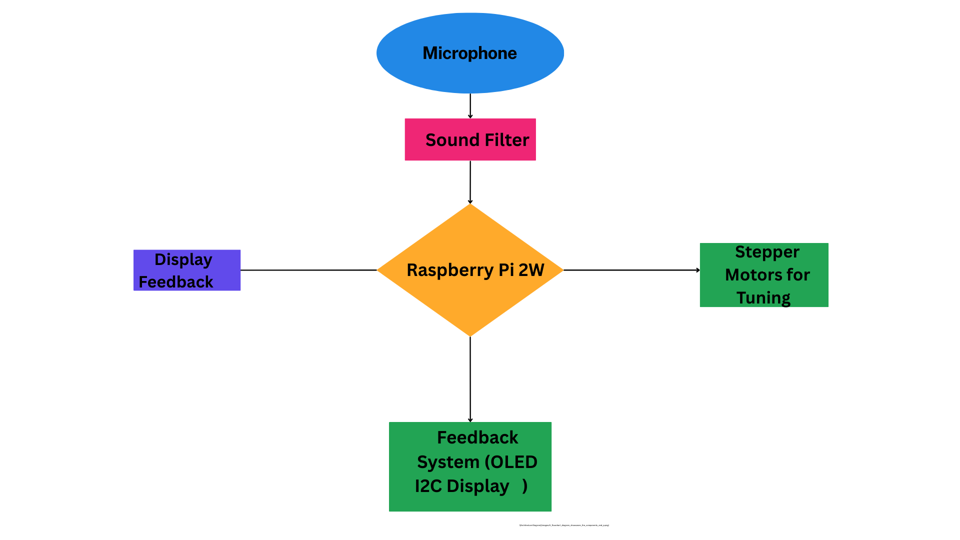
The Automatic Guitar Tuner combines several key components to create a system that captures sound from the guitar, processes it, and provides feedback to the user. The system is designed to automatically detect the pitch of each string, allowing the user to tune the guitar quickly and accurately. The following are the key components of the system: Main Components:
Microphone:
The microphone is used for capturing the sound of the guitar strings. It serves as the primary input device, detecting the frequency of the string vibrations.
The microphone sends the audio signal to the filter stage for noise reduction before being processed.
Sound Filter :
To improve accuracy, abfilter can be applied to remove unwanted background noise or harmonics from the captured sound.
The filter could either be implemented in hardware (using operational amplifiers) or in software (via a Rust-based signal processing library).
Microcontroller (Raspberry Pi 2W with Wi-Fi):
The Raspberry Pi 2W is the heart of the system. It receives the audio signal from the microphone and applies the FFT (Fast Fourier Transform) algorithm to analyze the frequencies of the guitar strings.
The Raspberry Pi runs the necessary Rust code to process the signal, determine the pitch, and provide feedback. Additionally, the Wi-Fi capability of the Raspberry Pi allows for potential remote control or integration with an app in the future.
Signal Processing (FFT):
The Raspberry Pi performs FFT on the signal from the microphone to extract the fundamental frequency of the string vibrations.
The system compares the detected frequency with the expected frequency for each string (e.g., E4, A4, etc.) and determines whether the string is in tune or needs adjustment.
Feedback System:
The feedback system provides feedback to the user based on the frequency comparison:
OLED Display: Displays messages such as "In Tune" or "Adjust" to indicate the tuning status of each string.
Buzzer: Beeps to give auditory feedback (short beep for "In Tune," longer beep for "Adjust").
RGB LED: (optional) Changes color to indicate the tuning status—green for in tune, red for out of tune.
Stepper Motors:
As a future improvement, the system could incorporate stepper motors to automatically adjust the tension of the guitar strings. The microcontroller would control the motors to fine-tune the strings, allowing the system to automatically bring them into perfect tune.
This feature would be added once the basic functionality is working, providing a fully automated tuning experience.
How the Components Connect:
Microphone to Filter:
The microphone captures the audio signal from the guitar strings. This signal is sent to the sound filter (if implemented) to clean up any unwanted noise before it reaches the microcontroller.
Filter to Raspberry Pi:
The filtered signal is then sent to the Raspberry Pi, where it is processed. The Raspberry Pi runs the FFT algorithm to analyze the frequencies of the guitar strings.
Raspberry Pi to Feedback System:
After processing the signal, the Raspberry Pi compares the detected frequency with the target frequency for each string.
The Raspberry Pi sends feedback to the OLED display, buzzer, or RGB LED to indicate whether the string is in tune or needs adjustment.
Stepper Motors:
If stepper motors are added later, the Raspberry Pi would control them to adjust the string tension automatically based on the detected frequency.
Log
Week 5 - 11 May
Week 12 - 18 May
Week 19 - 25 May
Hardware
Detail in a few words the hardware used.
Schematics
Place your KiCAD schematics here.
Bill of Materials
| Device | Usage | Price | Total |
|---|---|---|---|
| Raspberry Pi Pico 2W | The microcontroller | 39,66 RON | 39,66 RON |
| Modul microfon High Sensitivity Sound Detection | Captures sound from the guitar strings | 5,41 RON | 5,41 RON |
| Modul Amplificator Microfon cu AGC MAX9814 | Amplifies microphone signal | 24,90 RON | 24,90 RON |
| Modul OLED SPI de 0.96'' | For displaying tuning information (optional) | 23,79 RON | 23,79 RON |
| Buzzer Piezo 20mm | Provides auditory feedback | 1,49 RON | 1,49 RON |
| Buton 6x6x6 | Used for user input (optional) | 0,36 RON | 0,36 RON |
| Buton cu Capac Rotund Alb | Used for user input (optional) | 1,99 RON | 3,98 RON |
| Motor Pas cu Pas 42HB34F08AB | For future motorized tuning (optional) | 48,99 RON | 48,99 RON |
| Kit Breadboard HQ830 cu Fire si Sursa | For prototyping the circuit | 22,00 RON | 22,00 RON |
| Set de LED-uri Asortate de 5 mm si 3 mm (310 buc) | For visual feedback and debugging (optional) | 25,00 RON | 25,00 RON |
| Kit GPIO compatibil Raspberry Pi OKY1201 | To connect Raspberry Pi to various components | 12,00 RON | 12,00 RON |
| Total | 183,25 RON |
Software
Software
| Library | Description | Usage |
|---|---|---|
| st7789 | Display driver for ST7789 | Used to control the OLED display for visual feedback (e.g., tuning status) |
| embedded-graphics | 2D graphics library | Used for rendering graphics, drawing text or visual elements on the display |
| rustfft | FFT library for frequency analysis | Used for processing the sound signal and analyzing frequencies of guitar strings |
| embassy | Async runtime for embedded systems | Used for async handling of tasks, like microphone data processing and feedback updates |
| embedded-hal | Hardware Abstraction Layer | Provides generic traits for controlling hardware like GPIO, I2C, SPI, etc. |
| defmt | Debugging framework for embedded systems | Used to add debugging capabilities and monitor the system during development |
| rust-dsp | Digital signal processing library | Used for applying filters (e.g., low-pass or band-pass) to the microphone signal before FFT |
| biquad | Biquad filter library | Used for filtering audio signals, such as low-pass or band-pass filtering |