RustyDucky
USB HID Attack Device with Discord Exfiltration
Author: Duica Vlad
GitHub Project Link: https://github.com/UPB-PMRust-Students/project-dm-2025-DuicaVlad
Project Description
RustyDucky is a USB-based penetration testing tool built with Rust on the Raspberry Pi Pico W. The device emulates a USB keyboard, that is recognized by the computer as a HID Keyboard to automatically execute commands on target systems and exfiltrates captured data via Discord webhook.
Motivation
This project combines interests in cybersecurity (my passion), embedded systems, and Rust programming. It applies course knowledge including GPIO control, asynchronous programming, USB protocols, and real-time command execution in a practical security research context.
Details of the implementation - Block Diagram & Components
Architecture
Block Diagram
┌─────────────────────────────────┐
│  Raspberry Pi Pico W (RP2040)   │
│  ┌───────────────────────────┐  │
│  │ USB HID Keyboard Emulator │◄─┼── Target Computer
│  └───────────────────────────┘  │
│  ┌───────────────────────────┐  │
│  │ Payload Execution Engine  │  │
│  └───────────────────────────┘  │
│  ┌───────────────────────────┐  │
│  │ Status Indicators         │  │
│  │ (3× LEDs + Buzzer)        │  │
│  └───────────────────────────┘  │
└─────────────────────────────────┘
          ↓
┌─────────────────────────────────┐
│ Discord Webhook                 │
│ (Data Exfiltration)             │
└─────────────────────────────────┘
Components
- USB HID Module: Implements USB keyboard protocol using usbd-hid crate
- Payload Engine: Executes automated attack sequence with timing control
- GPIO Interface: Controls status LEDs and buzzer for visual/audio feedback
- Data Exfiltration: HTTP POST via curl to Discord webhook
Log
| Week | Date Range | Work Done |
|---|---|---|
| Week 1 | 17-23 Nov | Project research and documentation setup |
| Week 2 | 24-30 Nov | Hardware selection, ordered Raspberry Pi Pico 2 W |
| Week 3 | 1-7 Dec | Research on USB Rubber Ducky concepts and attack vectors |
| Week 4 | 8-14 Dec | Hardware arrived, studied component specifications and project architecture |
| Week 5 | 15-21 Dec | Development environment setup, initial code structure |
| Week 6 | 22-28 Dec | Component assembly, GitHub repository setup, serial communication testing |
| Week 7 | Jan 29-4 | Project research on Raspberry Pico 2w |
| Week 8 | Jan 5-11 | Libraries and code switched to Raspberry Pi Pico W |
| Week 9 | Jan 12-18 | Successful USB HID keyboard implementation and testing and discord webhook exfiltration, 3LEDs and buzzer indicators, final hardware integration |
Hardware
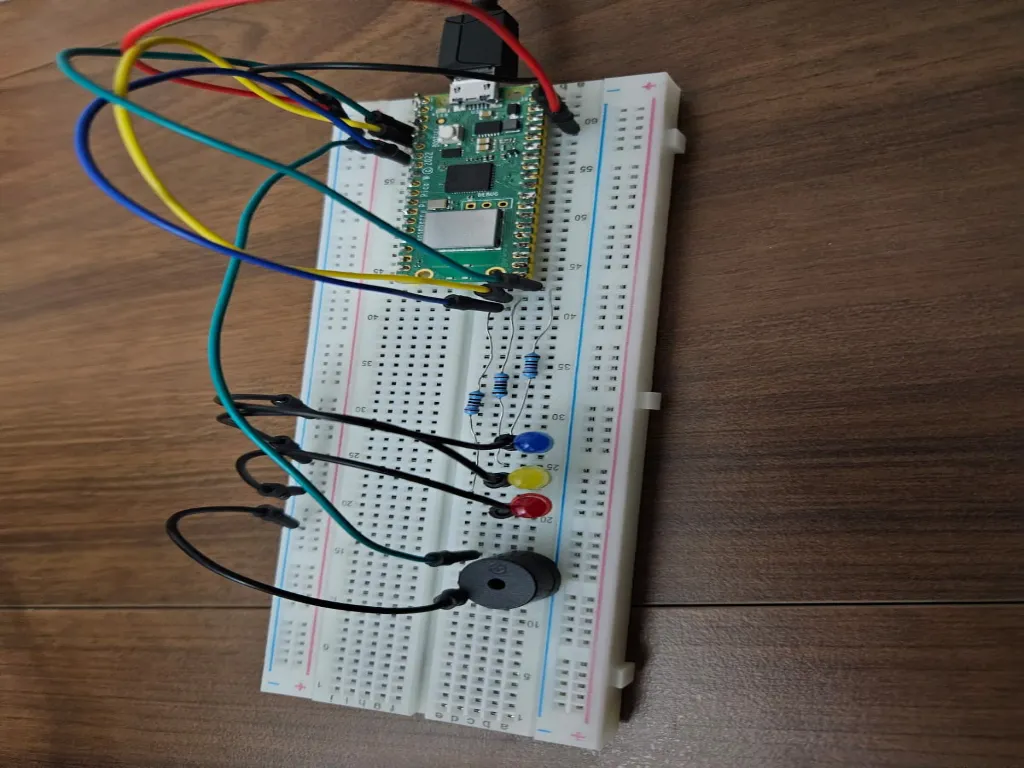
Here is the final assembled device:
Electrical Schematics
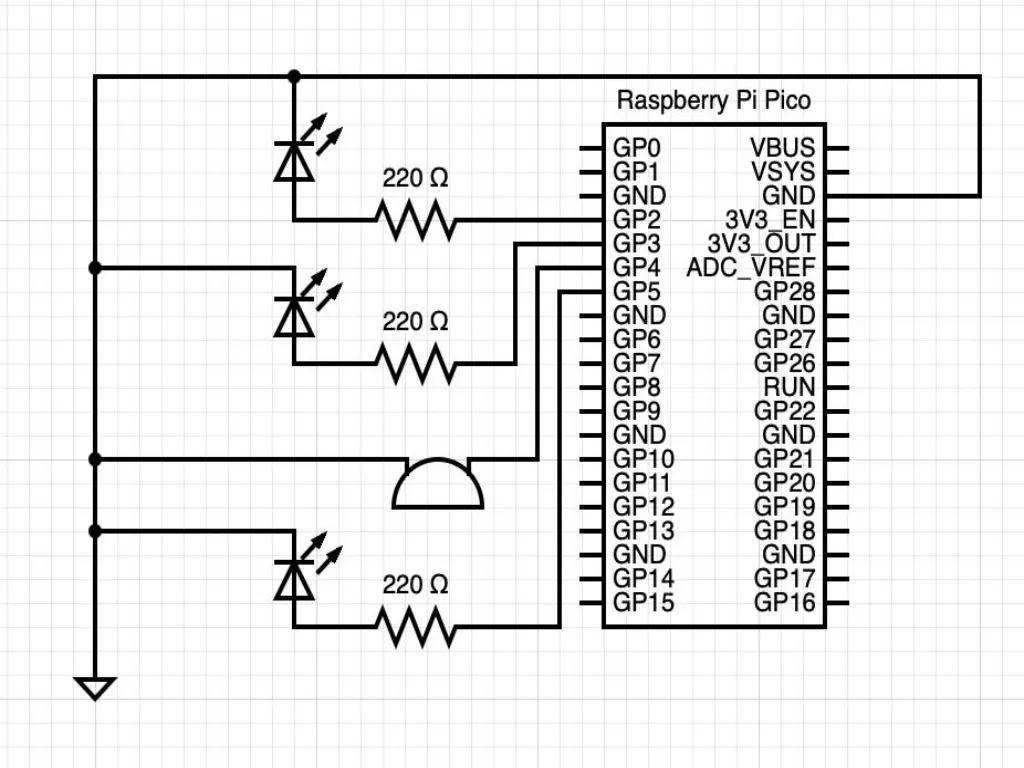 The Raspberry Pi Pico W integrates primary components. Breadboard adds status indicators.
Pinout Description:
Raspberry Pi Pico W
├── RP2040 (Dual Cortex-M0+, 133MHz)
├── USB Port (Micro USB)
├── CYW43439 WiFi Module (not used)
└── 2MB Flash Storage

Breadboard (Status Indicators)
├── LED 1 (GP2) - Win+R stage
├── LED 2 (GP3) - Command collection
├── LED 3 (GP5) - Discord upload
└── Buzzer (GP4) - Upload alert
Bill of Materials
| Component | Usage | Notes |
|---|---|---|
| Raspberry Pi Pico W | Main microcontroller | RP2040 dual core |
| Micro USB Cable | Programming & deployment | Standard USB-A to Micro-B |
| Breadboard | Circuit prototyping | For LEDs and buzzer |
| 3× LEDs | Status indicators | Any color, standard 20mA |
| 3× 220Ω Resistors | LED current limiting | For 3.3V GPIO |
| Active Buzzer (3.3V) | Payload alert | Connected to GP4 |
| Jumper Wires | Connections | Standard breadboard jumpers |
Details of the implementation - Technologies & Payload Execution Flow
Software
Technologies
- Rust (embassy-rp framework)
- usbd-hid (USB keyboard emulation)
- embassy-usb (USB device stack)
- Static cell (memory management)
Software Architecture
src/main.rs - Main
├── USB HID keyboard initialization
├── Payload execution engine
├── GPIO control (LEDs + Buzzer)
└── Timing and synchronization
Payload Execution Flow
Stage 1 (LED 1 - GP2 ON):
- Wait 3 seconds for user preparation
- Press Win+R
- LED 1 turns on
Stage 2 (LED 2 - GP3 ON):
- Type "cmd" and press Enter
- Wait for CMD to open (2 seconds)
- Type collection command:
whoami > %temp%\info.txt && hostname >> %temp%\info.txt && ipconfig >> %temp%\info.txt - LED 2 turns on
Stage 3 (LED 3 + Buzzer ON):
- Press Enter (file collection runs, 3 seconds)
- Type Discord webhook curl command
- LED 3 + Buzzer activate on command completion
- Press Enter (file uploads to Discord)
Total Execution Time: ~8-10 seconds
Results
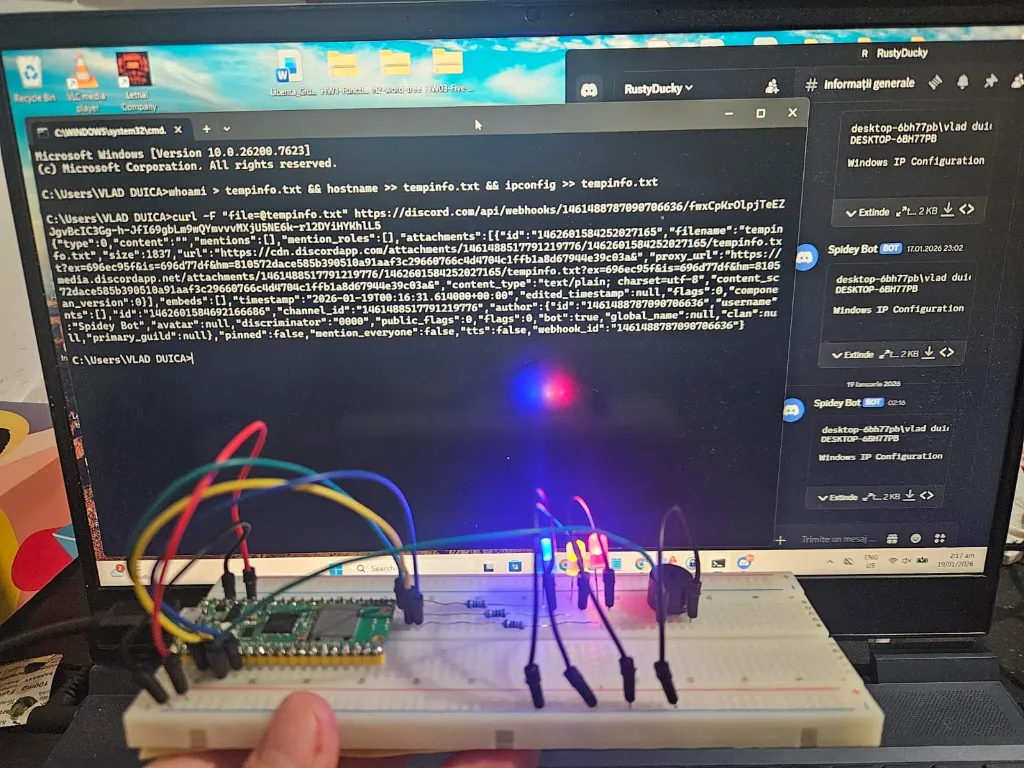
Here is the final Result:
Completed:
- USB HID keyboard enumeration on Windows
- Automated command execution via keystrokes
- System information collection (whoami, hostname, ipconfig)
- File-based data exfiltration to Discord
- Status LED indicators (3 stages)
- Buzzer audio alert to mark it done
- Hardware assembly and testing
- GitHub repository with full source
Tested & Working:
- Device recognized as USB keyboard
- Commands execute reliably on target
- Data appears in Discord channel within seconds
- LEDs light up at correct stages
- Cross-platform (tested on Windows)
Technical Achievements
- Character Mapping: Full US keyboard layout support (a-z, A-Z, 0-9, special chars, @, /, :, -, _, |, ., &, $, (, ), =, ', `, ,, >)
- Timing Synchronization: Precise delays between stages to ensure OS readiness
- Minimal Code Footprint: 300 lines of Rust (comments removed per requirements)
- Real Hardware Integration: 3 status LEDs + buzzer for user feedback
- Zero Manual Intervention: Completely automated from plug-in to Discord notification
Conclusions
RustyDucky demonstrates practical application of embedded Rust for security research. The project successfully implements a USB HID attack device with automated command execution and data exfiltration to Discord. All components tested and validated on hardware.