Energy monitor
A device that analyzes electric power consumption
Author: Țăranu Vladimir-Teodor
GitHub Project Link: https://github.com/UPB-PMRust-Students/fils-project-2026-domnulvlad
Description
The project involves a measurement device installed within a distribution box, which monitors AC power consumption in real-time, and a portable dashboard which displays live data.
It operates by continuously sampling voltage and current sensors, to calculate the real power being consumed. The device processes analog data to determine the phase shift between the sine waves of voltage and current, which allows it to compute the power factor.
The main (measurement) device features a built-in LCD, but considering distribution boxes may not be easily accessible, a secondary (dashboard) device, with a larger touchscreen LCD, communicates with the power meter to provide the user with the same data in a more convenient format and logs to an SD card.
Both devices are based around the ESP32-C6, and they communicate wirelessly via the proprietary ESP-NOW protocol. It is bidirectional, features fast data rates, low latency, and operates in the 2.4 GHz spectrum using Wi-Fi hardware.
Motivation
I have always been interested in the efficiency of the devices we use every day, and the power factor is a very important part of this. Also, by having a system that provides a good estimate of your electricity consumption, you can stay aware of your habits and optimize them, to conserve energy and save some money on your bills.
Architecture
Components
The system is divided into two independent devices which communicate wirelessly.
| Component | Interface |
|---|---|
| Microcontrollers | ESP-NOW |
| Current sensor | variable voltage |
| Voltage sensor | variable voltage |
| Displays | MIPI-DSI |
| Touchscreen | SPI |
| SD card | SPI |
Diagram
Log
Week 4-5
- Research
- Ordered parts
- Started working on software
Week 6-8
Implemented on dashboard:
- simple code for an 8080-parallel LCD I had laying around, will be replaced with MIPI-DSI once the new display arrives
- only for testing, I implemented ESP-NOW communication in Arduino; will port to Rust
Implemented on measurement device:
- data processing algorithm (untested, sensors haven't arrived yet)
- basic ESP-NOW communication
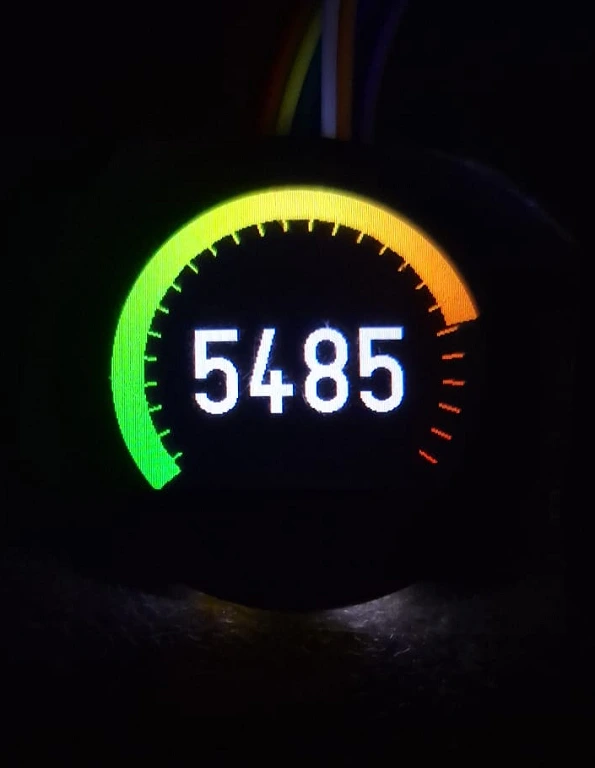
- graphical gauge on the round LCD
Week 9
- Started working on this documentation.
- Started working on the PCB designs for both devices.
Week 10
- Finished the PCB designs and ordered them.
- New display for dashboard arrived.
Implemented on dashboard:
- touchscreen handling
- basic UI
- basic ESP-NOW communication
Week 11
Implemented on dashboard:
- SD card reading and writing
- bidirectional ESP-NOW communication
- better UI
Implemented on measurement device:
- Wi-Fi access point with HTTP server for setting the time and date from a phone
- DNS server for "captive portal" functionality (webpage opens automatically when connecting to the network)
Week 12
Implemented on dashboard:
- separated old UI into pages (Essentials and Advanced)
- chart page that reads from the SD card and plots data (historical + real-time)
- settings page for choosing what is displayed on the measurement device
Implemented on measurement device:
- non-volatile storage for keeping kWh value and settings across power loss
- multiple pages for different parameters, similar to power but with different color schemes
- measurement units displayed under value
Week 13
Implemented on dashboard:
- settings page for setting energy cost
- prediction of future energy and cost
- battery icon and percentage
- finalized UI
Implemented on measurement device:
- logic for calculating cost based on baseline and billing cycle
- finalized visualizations
Hardware
Both the measurement device and the dashboard are based on the ESP32-C6 microcontroller. They have built-in ST7789 displays of different sizes.
The measurement device samples an SCT-013 non-invasive current clamp and a ZMPT101B isolated transformer (through an amplifier circuit).
The dashboard's interface is controlled by a resistive touchscreen processed by an XPT2046. For data storage, a standard SD card is used.
Bill of Materials
| Device | Usage | Price |
|---|---|---|
| SCT-013 | Non-invasive current clamp | 25 RON |
| ZMPT101B | Isolated voltage transformer module | 15 RON |
| 0.96in ST7789 | Display for measurement device | 25 RON (2 years ago) |
| 2.8in ST7789+XPT2046 | Display for dashboard | 50 RON |
| XIAO ESP32-C6 | Microcontroller for dashboard (with built-in battery management) | 55 RON |
| PCBs | PCBs for both devices, 5pcs each | 87 RON |
| Parts | Components for the PCBs | 182 RON |
Schematics
Measurement device
Dashboard
PCBs
Measurement device

Dashboard

Photos
Overview

Measurement device

Inside the box:

Pages:

Dashboard device

Video
Device operation demonstration
Software
Crates
| Crate | Description | Usage |
|---|---|---|
| esp-hal | no-std hardware abstraction layer for ESP32 | Support for the ESP32-C6 |
| esp-radio | Wi-Fi driver | Support for ESP-NOW and Wi-Fi |
| esp-rtos | Real-time operating system | Needed for esp-radio |
| esp-storage | Flash access | Non-volatile storage |
| sequential-storage | Key-value pair data storage | Non-volatile storage |
| embassy | Async framework | Cooperative multitasking |
| lcd-async | Generic MIPI-DSI driver with async support | Driver for the ST7789 displays |
| embedded-graphics | 2D graphics library | Drawing graphics on the displays |
| u8g2-fonts | U8g2 font system | Better fonts for embedded-graphics |
| micromath | Math library | Trigonometric functions |
| bytemuck | Safe byte operations | Serialization and deserialization for ESP-NOW data |
| heapless | Data structures that don't require dynamic allocation | Strings and vectors |
| embedded-fatfs | FAT filesystem | SD card |
| chrono | Date and time | Managing timestamps |
| embassy-net | Async network stack | Built-in webpage |
| edge-dhcp | DHCP protocol | Built-in webpage |
| edge-http | HTTP protocol | Built-in webpage |
| edge-captive | Captive portal DNS server | Built-in webpage |
Design
Measurement device
Webpage
Four tasks are used to run the webpage used for setting the time and date via the captive portal over the Wi-Fi access point:
net_task: runs the network stack provided by embassy_netrun_dhcp: runs the DHCP server provided by edge_dhcprun_captive_portal: runs the DNS server provided by edge_captive for captive portal functionalityrun_http_server: runs the HTTP server provided by edge_http for serving the actual webpage
When the user presses the button on the webpage, some Javascript code grabs the client's system time and sends it back the server.
Once the server receives the time, it notifies the application task by sending SetTime on the event channel.
ESP-NOW
For bidirectional communication with the dashboard, ESP-NOW is managed by two tasks: espnow_listener and espnow_broadcaster.
After startup, when the two devices don't know each other's MAC address, they must "connect" (although the protocol itself is connectionless, I opted to avoid sending everything as plain broadcasts).
The dashboard will periodically send a constant message (b"EnMonSLAVE\0") as a broadcast.
When the measurement device receives it, it now knows the dashboard's MAC address and starts sending it measurement data.
When the dashboard receives measurement data, it now knows the measurement device's MAC address, and now the devices are "connected".
Once connected, the dashboard switches to periodically sending all current settings which the measurement device needs (current time, selected page, and settings for cost calculation).
Whenever it receives settings from the dashboard, it sends a NewSettings event to the application task.
Another feature of the bidirectional communication is that the current time and date cannot be lost if (at most) one of the devices loses power,
due to the fact both devices keep track of time independently, only syncing when necessary.
If the measurement device suffers power loss and restarts, but the dashboard still has the time, the time is inherently included in the ESP-NOW message.
In this case, the time is synced from the message, and a SetTime event is sent to the application task.
Measurements
The measurement_task continuously polls the voltage and current sensors (ADC) and performs calculations to determine the RMS voltage, RMS current, power factor and real power.
As configured currently, it produces a measurement every ~1 second, which it then sends to the application task as NewMeasurement on the event channel.
App
The app_task processes measurement data, draws to the screen and manages the page system.
Its loop waits until it receives something on the event channel.
It responds to the following events:
SetTime: time and date were received (via HTTP server or from the dashboard via ESP-NOW)NewMeasurement: the measurement task produced dataNewSettings: the dashboard changed the page or the settings for cost calculation
When it receives measurement data, it firstly converts the instantaneous power into energy, by using the time difference since the last update. The resulting energy is added to an accumulator, which is a strictly increasing counter, like any other energy meter.
Whenever new settings are detected from the dashboard, they are written to non-volatile storage (flash). This also happens if the accumulated energy increases by at least 0.5 kWh. At startup, all values are read from this storage, to restore the state from the previous run.
Depending on the page selected via the dashboard, update_gauge() calls the corresponding function (real power / energy / cost / voltage / current / power factor).
This draws a circular gauge, that fills up from left to right depending on the value of the parameter.
All pages use the same style of gauge, but different color gradients depending on the parameter.
Cost calculation works by storing the kWh value at which the billing cycle begins (baseline). This is done by the dashboard, which reads back what it wrote on its SD card, to find the kWh value on the selected starting day. The energy consumption is simply the difference between the current total energy and the baseline. Then, every month, on the configured day, this baseline is reset. For example, if the starting day is configured as 20, then the cost and energy are reset on the 20th of every month.
The measurement device also stores the starting day, so that it can continue this resetting process without the dashboard needing to be connected. When it detects a new day, and it's equal to the billing cycle's starting day, it resets the baseline to the current total energy, all by itself.
Dashboard device
Touchscreen
The touchscreen controller has a dedicated IRQ pin that is normally high, but goes low when you start pressing on the screen.
To use it, an interrupt is set up, waiting for a falling edge on that pin.
In the ISR, a signal is given, waking up the touchscreen task.
The touchscreen_task waits until it receives a signal from the ISR, meaning that a press started.
Then, it requests the pressed position from the controller every 10 ms, via SPI transactions according to the datasheet.
It does a bit of averaging to remove glitches, and then converts the readings into screen coordinates using some pre-calculated calibration constants.
When the press starts, it sends a TouchPressed event to the application task via the event channel, containing the coordinates.
Then, when the press ends (detected by the IRQ pin going back high), it similarly sends TouchReleased.
ESP-NOW
The architecture is similar to what was described above for the measurement device, but "mirrored".
- When not "connected", it periodically broadcasts the message
b"EnMonSLAVE\0". - When it receives measurement data, it becomes connected.
- When connected, it periodically sends current time and settings to the measurement device.
If the time isn't known yet, and a message from the measurement device contains it, it syncs with that received time and sends a SetTime event to the app task.
When the time is known, it is automatically included in every message sent to the measurement device.
Upon receiving measurement data, it sends a EspNowData event to the app task.
If, while connected, the periodic settings message fails to send (doesn't receive an acknowledgement, internal to ESP-NOW), it means the measurement device lost power or is out of range.
In this case an EspNowDisconnected event is sent to the app task, mainly to update a visual indicator.
Clock tick and battery
The clock_and_battery_update_task, originally used for updating the displayed time every 500 ms, also measures the battery voltage.
It implements a low-pass (exponential moving average) filter, to avoid sudden fluctuations in voltage.
Every 500 ms, it performs the voltage measurement, updates the filter, and sends an UpdateClockAndBattery event to the app task.
App
The app_task draws to the screen, manages the buttons, page system and writing/reading to/from the SD card.
Apart from storing a few settings, the SD card is mainly used for logging energy data into CSV files.
The filesystem used is FAT32, as it is very common and easy to work with.
For logging, it creates a LOGS folder in the root, and then a folder for the current year and month, named like YYYY-MM.
Inside it, it creates a file for the current day, named like DD.CSV.
Whenever a new day begins, a new file is created, corresponding to that day.
A problem obviously arises when the dashboard doesn't know the time and date, because the user hasn't set it on the measurement device yet.
In this case, it logs to a special TEMP.CSV file in the root folder.
- The first value in the CSV format is normally the timestamp, expressed as milliseconds relative to epoch (January 1st, 1970 at 00:00 UTC).
- Since it doesn't know the time, it will instead write that value as milliseconds since device boot.
- When the time is finally set, it must move whatever it has written in the temporary file to the file corresponding to the current day.
- When doing so, it also converts the milliseconds since startup into milliseconds since epoch, by doing a few subtractions.
- In this way, the logs always contain the correct timestamp.
While managing the SD card, the task also waits for something on the event channel. It responds to the following events:
TouchPressed: the touchscreen was pressedTouchReleased: the touchscreen was releasedEspNowData: the measurement device provided new dataEspNowDisconnected: the measurement device cannot be reachedSetTime: time and date were synced from the measurement deviceUpdateClockAndBattery: theclock_and_battery_update_tasksent the current battery voltage, also acting as a tick to update the clock if that page is open
The main part of the menu system is designed as a circular rotation between a few pages: Essentials, Advanced, Chart, Prediction, Clock. Each of them has the same left and right arrow buttons at the bottom, to switch the page between these.
Every page in the menu system has a constant list of buttons, each with its own style and assigned action. Button actions include going to another page, going to the previous page, changing a specific setting, etc.. When entering a new page, its initial contents are drawn, and then the buttons are rendered on top of it.
When the touchscreen is pressed, if that press lands inside a button, the button's ID is stored. Then, when the touchscreen is released, if the release position was also inside the same button (if the stored ID is the same), that button's action is executed. If it's released outside the button, the press is cancelled and no action is executed.
Whenever settings are changed, they are immediately written to the SD card (if it's inserted and available).
When entering the Chart page, it must additionally load historical data from the SD card. If the SD card is not mounted for any reason, or the time and date aren't available, a warning is shown instead. If everything is OK, reading from the SD card starts, and it displays progress bars to tell you how much processing is left. Since the process is long, due to the amount of data in each file, touchscreen events still get processed, so you can press a button to go to another page, thus cancelling the operation. You can also choose which parameter is being plotted, along with the period of historical data. Changing the parameter will not interrupt the loading process, but changing the period will, since it needs to load a different set of data.
When new measurement data is received, it must be displayed and logged. If the SD card is mounted and error-free, a CSV line is appended to the currently open file (either the temporary file or the day's file, as described above). If the Chart page is currently open, and data has already been loaded from the SD card, then the new measurement is simply added to the plot, to keep updating it in real-time.
The Essentials and Advanced pages are similar, only differing in layout and amount of parameters displayed. The Clock page is a simple time and date display.
The Prediction page is a bit more interesting, since it (linearly) extrapolates from the data recorded in the current billing cycle, to predict how much energy will have been consumed by the end of the cycle, along with its cost. There must be at least one full day of data available, otherwise it displays a warning.
The Settings menu is accessible from any page in the main rotation. Here, you can mount/unmount the SD card, change which page is displayed on the measurement device, and set parameters for cost calculation.
In the Cost settings menu, you can choose the price per kWh and the associated currency. Here, you also set the starting day, meaning the day of the month on which the billing cycle resets.
There are four icons in the top-right corner that indicate the status across all pages:
- battery: percentage is shown inside it when it drops below 100%; the color of the icon is a gradient between green and red, depending on the percentage
- clock: red if the time and date aren't known, green otherwise
- file: red if the SD card is not mounted (not inserted, or has error, or was manually unmounted), green otherwise
- antenna: red if the measurement device isn't "connected" over ESP-NOW, green otherwise
If at any point there is an error writing to the SD card, a warning is displayed. A different warning is displayed if the device was powered off without unmounting the SD card first, and also when the measurement device connects and it doesn't have its time set.
Diagram
Links
- Old Arduino library for energy monitoring
- LCD tutorial
- SD card tutorial
- Webserver tutorial
- ESP-NOW example
- HTTP server with captive portal (needs some changes to work)