LightSaber Pi
Straight out of Star Wars — with just a bit of Rust — we bring you... The LightSaber Pi.
Author: Armega Andrei 331CC
GitHub Project: UPB-PMRust-Students/proiect-AndreiArmega
Description
The project revolves around — as much as fictional laser technology allows — a lightsaber, the iconic weapon from the Star Wars franchise. Instead of Kyber crystals from Ilum, the blade will be powered by batteries and an addressable LED strip (WS2811). Iconic sound effects will be played through a speaker, while a gyroscope detects movement to trigger those sounds. Finally, all components will be encapsulated in a DIY hilt.
Motivation
The primary drive behind this project is simple: lightsabers are cool. Beyond that, it brings a fun and creative break from the seriousness of everyday life and demonstrates embedded systems in an engaging way.
Architecture
3D Model

Components
- Raspberry Pi Pico W
- LED strip WS2811
- Level Shifter HW-221
- Gyroscope MPU6500
- Current Source Stabilizer (5V to 3.3V)
- LiPo Battery: GENS ACE Tattu 7.6V / 300 mA / 75C
- Amplifier: MAX98357A
- 4-pin Buttons
- Breadboards
Log
Week 5 (May 11)
- Created the initial documentation, 3D concept, and schematic of the project.
- Ordered all the necessary components.
- Researched libraries for audio and LED control.
Week 12 (May 18)
(To be filled)
Week 19 (May 25)
(To be filled)
Hardware
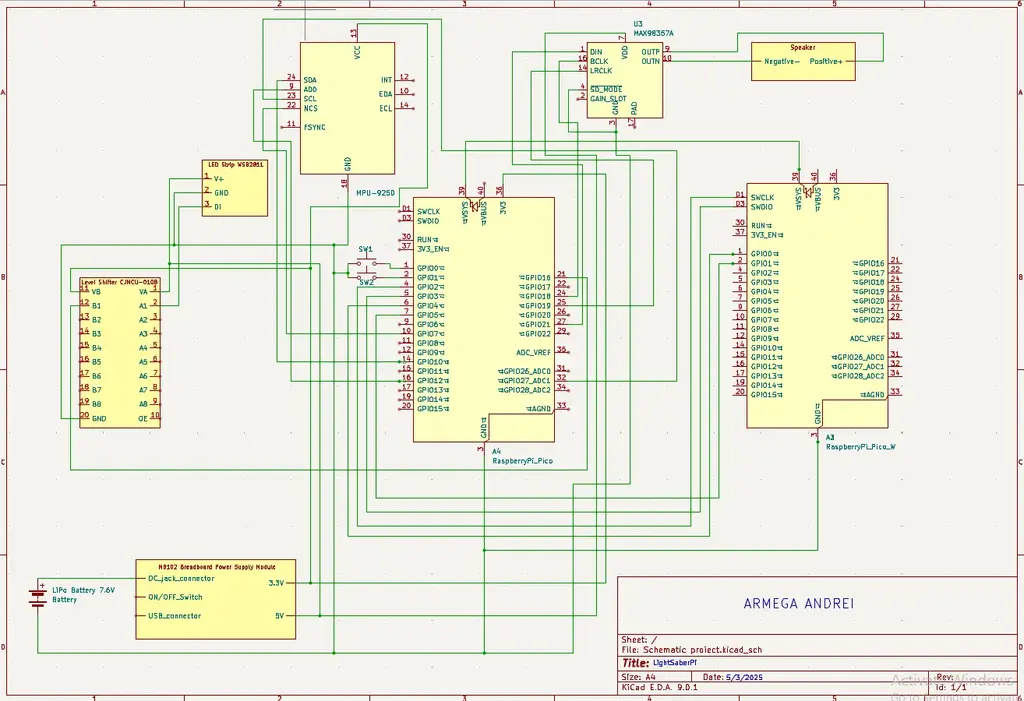
We use two Raspberry Pi Pico W boards — one for the core functionality, the other for debugging.
Movement detection (e.g., to play a whoosh sound) is done using the MPU6500 gyroscope.
For sound output, we use an 8Ω 2W speaker and a MAX98357A amplifier.
The lightsaber blade is illuminated using a WS2811 addressable LED strip. A level shifter ensures proper communication between the 3.3V logic of the Pico and the 5V LEDs.
Power is supplied via a 7.6V LiPo battery, regulated to 5V and 3.3V using a power supply module.
User input (powering on/off, switching modes) is handled via 4-pin push buttons.
Schematic
Bill of Materials
| Device | Usage | Price |
|---|---|---|
| 2× Raspberry Pi Pico W | Main microcontroller and debugging | 75 RON |
| WS2811 48 LED | Blade lighting | 25 RON |
| Level Shifter HW-221 | Voltage conversion (3.3V to 5V) | 8 RON |
| MPU6500 Gyroscope | Movement detection | 15 RON |
| MAX98357A Amplifier | Audio output | 17 RON |
| Power Supply Module (5V–3.3V) | Voltage regulation | 5 RON |
| GENS ACE Tattu 7.6V LiPo Battery | Power source | 60 RON |
| 6×6×6 Push Button | Control interface | 1 RON |
| 2× Breadboard (750 Points) | Circuit prototyping | 18 RON |
| Jumper Wires | Circuit connections | 8 RON |
| 20cm 40p Male-Female Wires | Circuit connections | 8 RON |
| USB to MicroUSB Adapter Shim | Connectivity | 3 RON |
| USB Cable | Power and data | 6 RON |
| Speaker (8Ω, 2W) | Audio playback | 5 RON |
Software
| Library | Description | Usage |
|---|---|---|
defmt | Logging framework for embedded systems | Efficient development-time logging |
defmt_rtt | Real-Time Transfer logger | Real-time debug output |
embassy_executor | Async task executor for embedded devices | Manages async task scheduling |
embassy_rp | Embassy support for the RP2040 | Low-level hardware access |
embassy_time | Time abstraction for async systems | Timers and delays |
panic_probe | Lightweight panic handler with logging | Debugging panic causes |
ws2811-spi | SPI driver for WS2811/WS2812 LED strips | Controls RGB lighting |
embedded-audio | Audio traits and tools for embedded systems | Audio playback abstraction |
mpu6050 | I²C driver for MPU6050 motion sensor | Motion detection |