Smart Pet Door
A smart pet door that unlocks automatically when a registered pet approaches.
Author: Uritu Andra-Ioana
GitHub Project Link: https://github.com/UPB-FILS-MA/project-andrauritu
Description
The Smart Pet Door project is designed to provide pets with the freedom to enter the home while ensuring security against unregistered animals. It utilizes a combination of BLE beacon technology and an infrared motion sensor to detect and authenticate a pet's approach and to automatically manage access.
Motivation
This project idea actually came from my mom. Our family cat, admittedly not the sharpest tool in the shed, has struggled with using traditional pet houses. Every time we tried giving him one, other neighborhood cats would take it over. They’d get inside, eat his food, and leave him outside, especially when it rained and we weren't home to let him in. To help him have a place of his own, my mom thought a smart pet door would be really useful. This system uses a beacon-based entry mechanism that ensures only our cat can enter, preventing other animals from accessing his shelter and food. This door not only promises to give our beloved but intellectually challenged cat the comfort and security he deserves but also offers peace of mind, knowing he has access to his own space, regardless of whether we are home to assist him.
Architecture
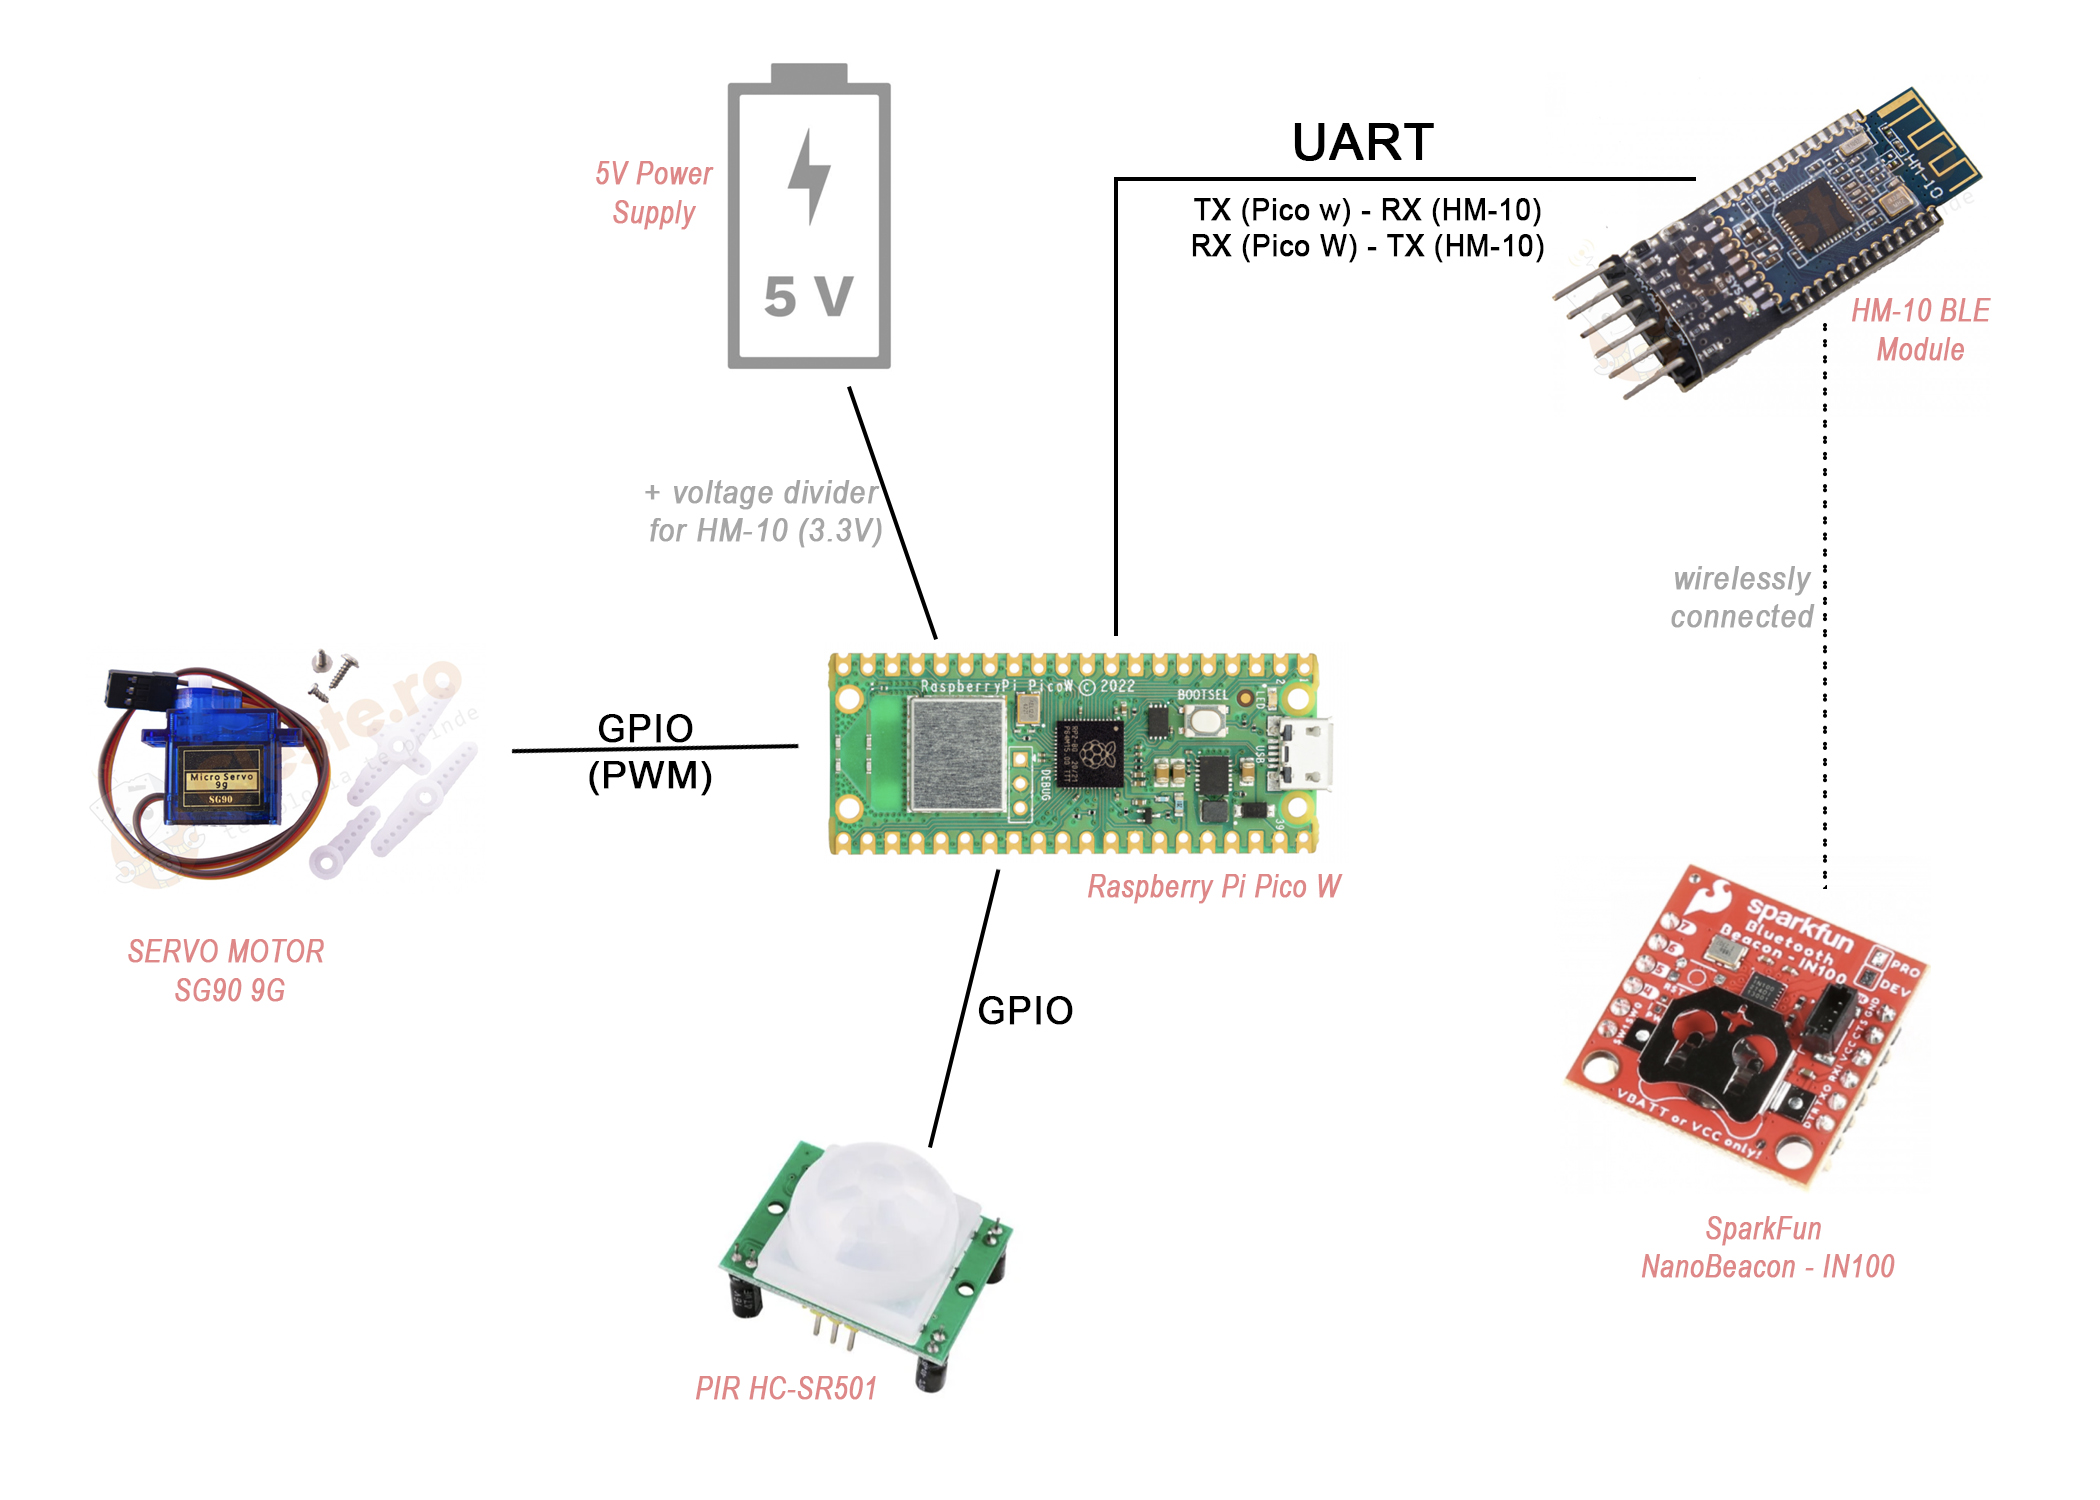
The system consists of the following main components:
- Infrared Sensor: Detects movement near the door.
- Raspberry Pi Pico W: Acts as the central processing unit, interpreting signals from the infrared sensor and controlling the other components.
- HM-10 BLE Module: Handles Bluetooth communication to scan for the NanoBeacon worn by the pet.
- Servomotor: Operates the locking mechanism of the door.
- NanoBeacon IN100: The beacon worn by the pet, which is scanned by the HM-10 module.
System Operation
- The Infrared Sensor detects motion near the door and signals this to the Raspberry Pi Pico W.
- The Raspberry Pi Pico W, upon receiving the motion alert, instructs the HM-10 BLE Module to scan for the NanoBeacon.
- If the HM-10 BLE Module detects the NanoBeacon within a predetermined range, it communicates this back to the Raspberry Pi Pico W.
- The Raspberry Pi Pico W then commands the Servomotor to unlock the door.
- The door remains unlocked for 10 minutes, after which it re-locks automatically unless the Infrared Sensor detects additional movement, prompting the door to stay unlocked or re-scan for the beacon.
Log
Week 6 - 12 May
In this week I bought the last of the necessary components and configured the NanoBeacon to emmit a certain UUID, and also tested the RSSI values to see which values correspond to certain distances from the beacon scanner (I used my phone for scanning beacons initially).
Week 7 - 19 May
In this period I configured the HM-10 module to scan beacons and find the one I had programmed, and it successfully did so in PowerShell. However, the code is still in progress in Embassy, where I am trying to put all functionalities together (the beacon scanning, motion sensing and operating the servomotor accordingly). I did the KiCad schematics and an initial, basic prototype of the door (mounted, for now, on a cardboard, using tape).
Week 20 - 26 May
In this week we succeeded to make the code work in Embassy with all the needed functionalities (even distance recognition, so that the door does not unlock if the cat is just nearby but not at the door) and I also decorated the prototype a bit. After this week we had the PM Faire where I had the chance to present my project to others and everything went smoothly.
Hardware
The circuitry:

When an authorized pet (carying the BLE beacon) is at the door (the servomotor moves to horizontal position to allow access):
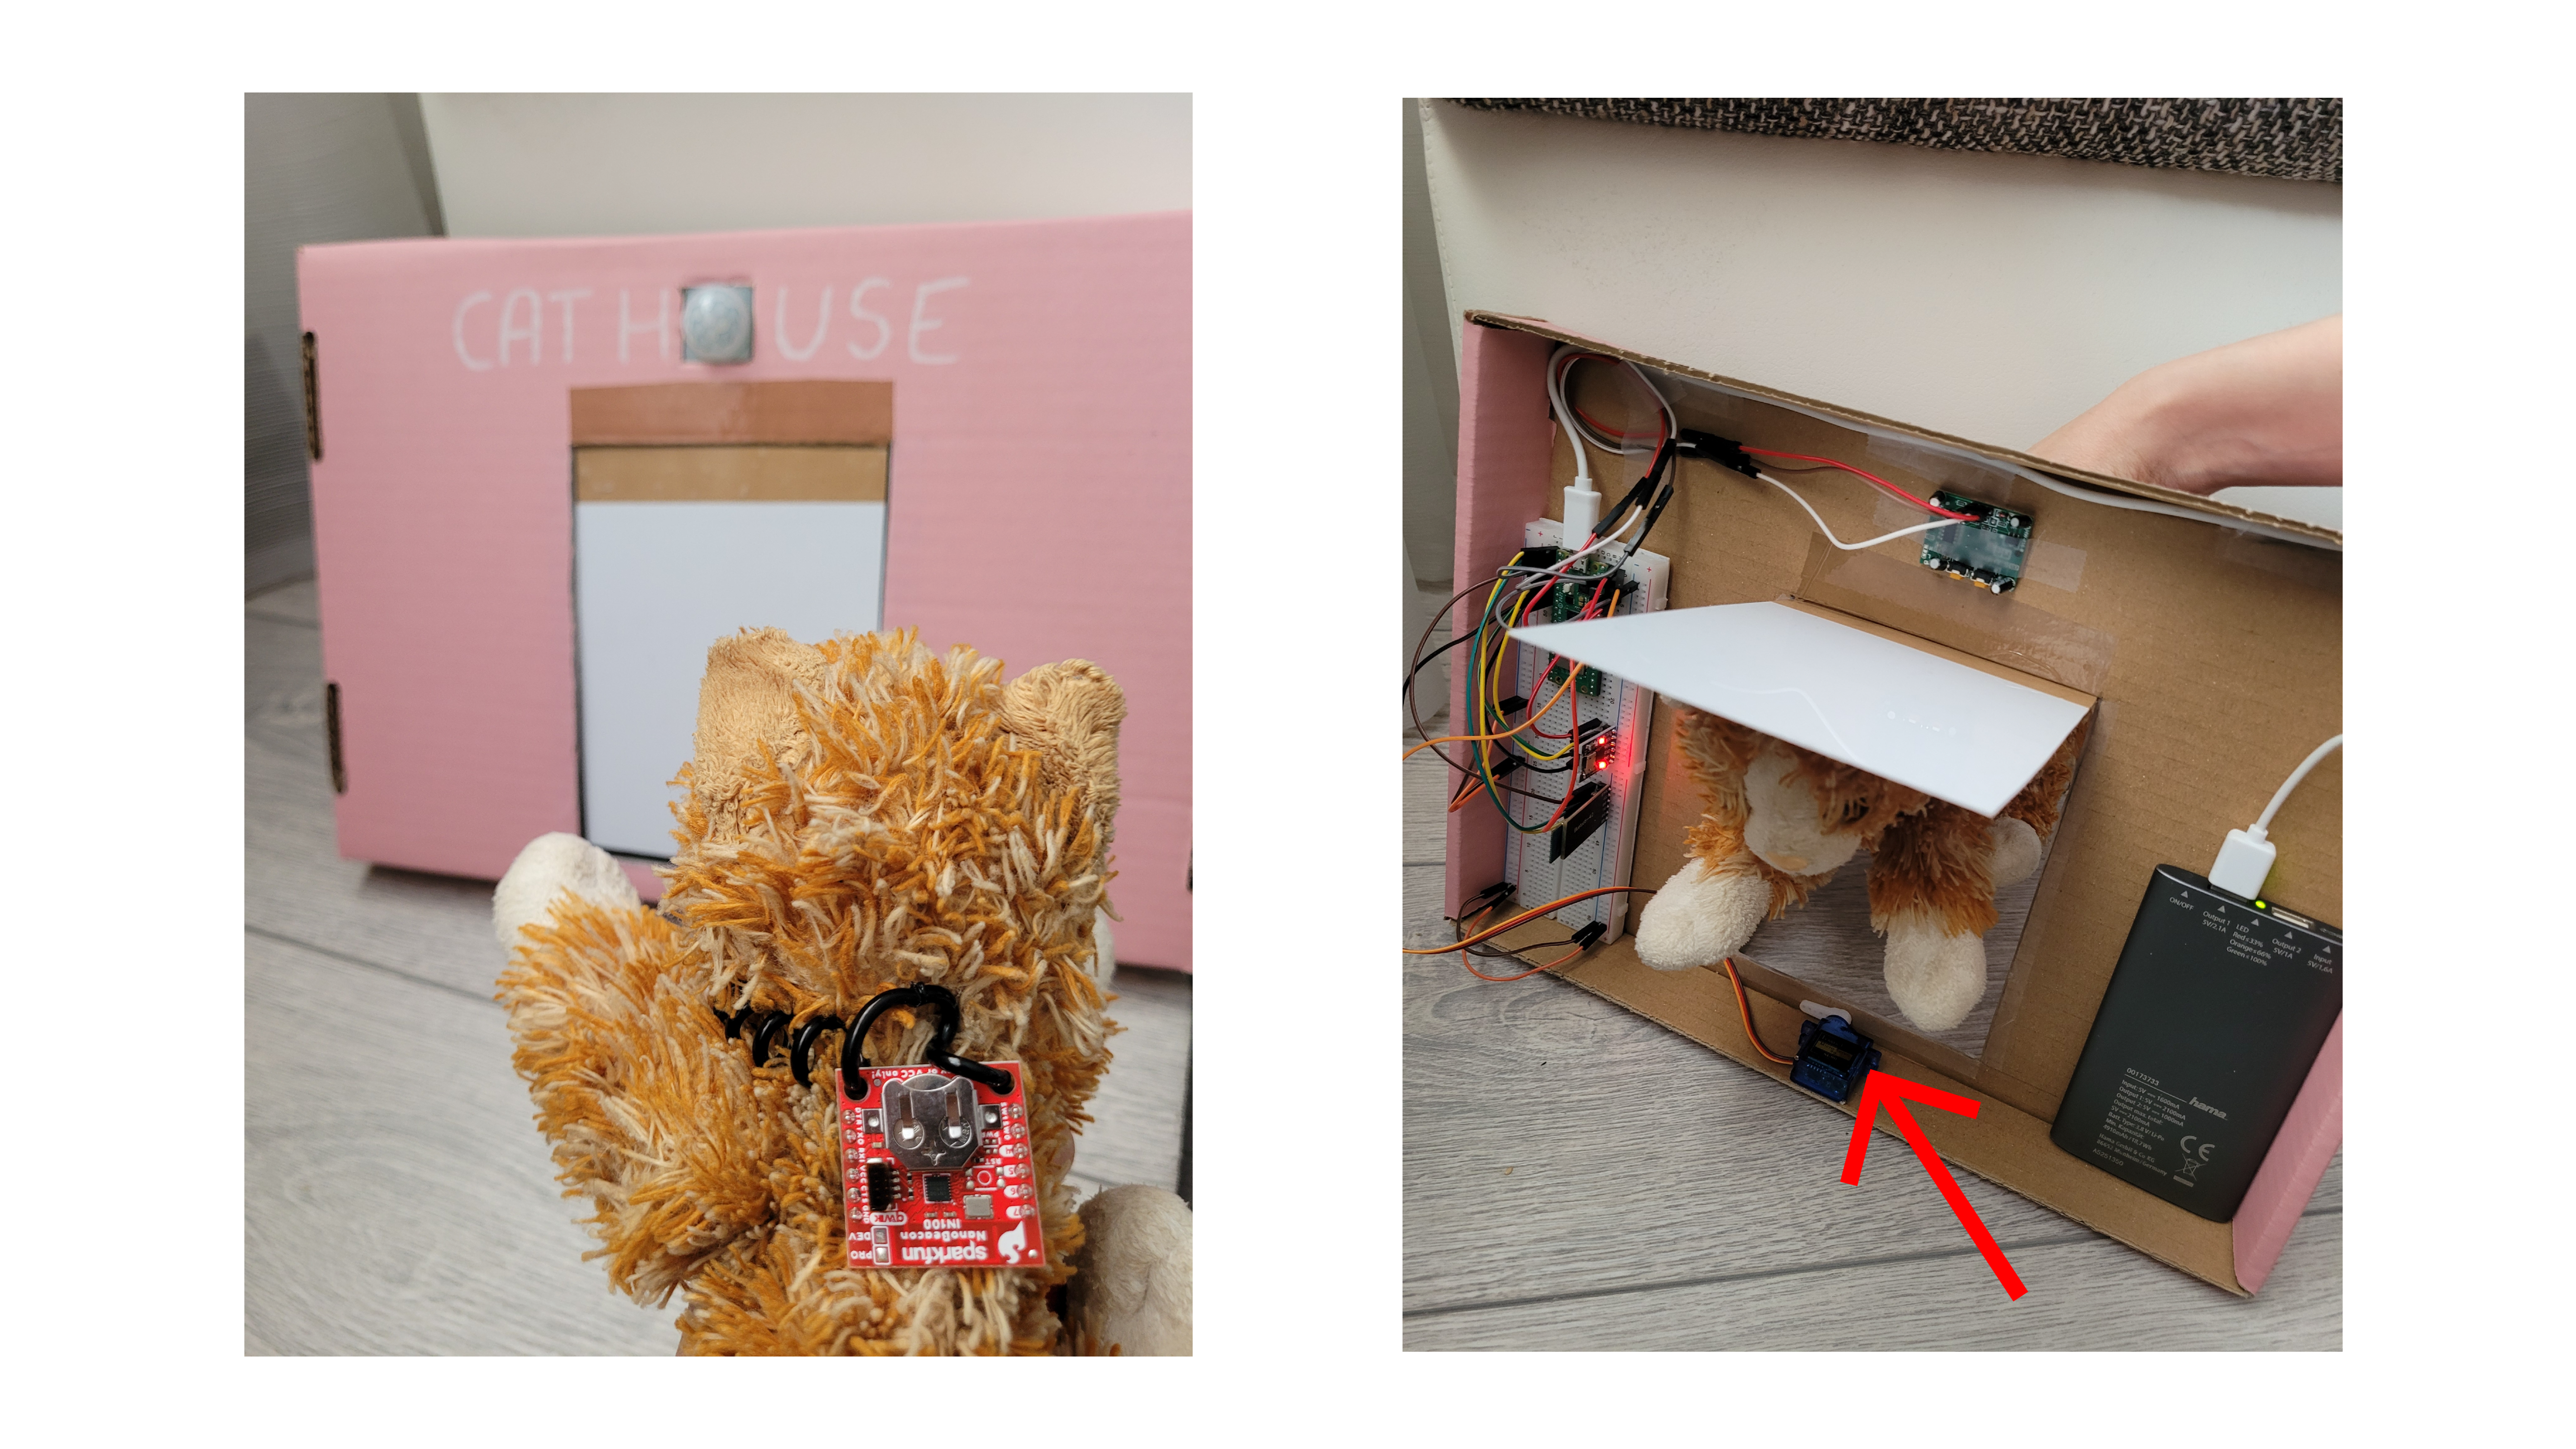
When an unauthorized pet is trying to enter (the servomotor remains vertical, stopping the flap door from being pushed):

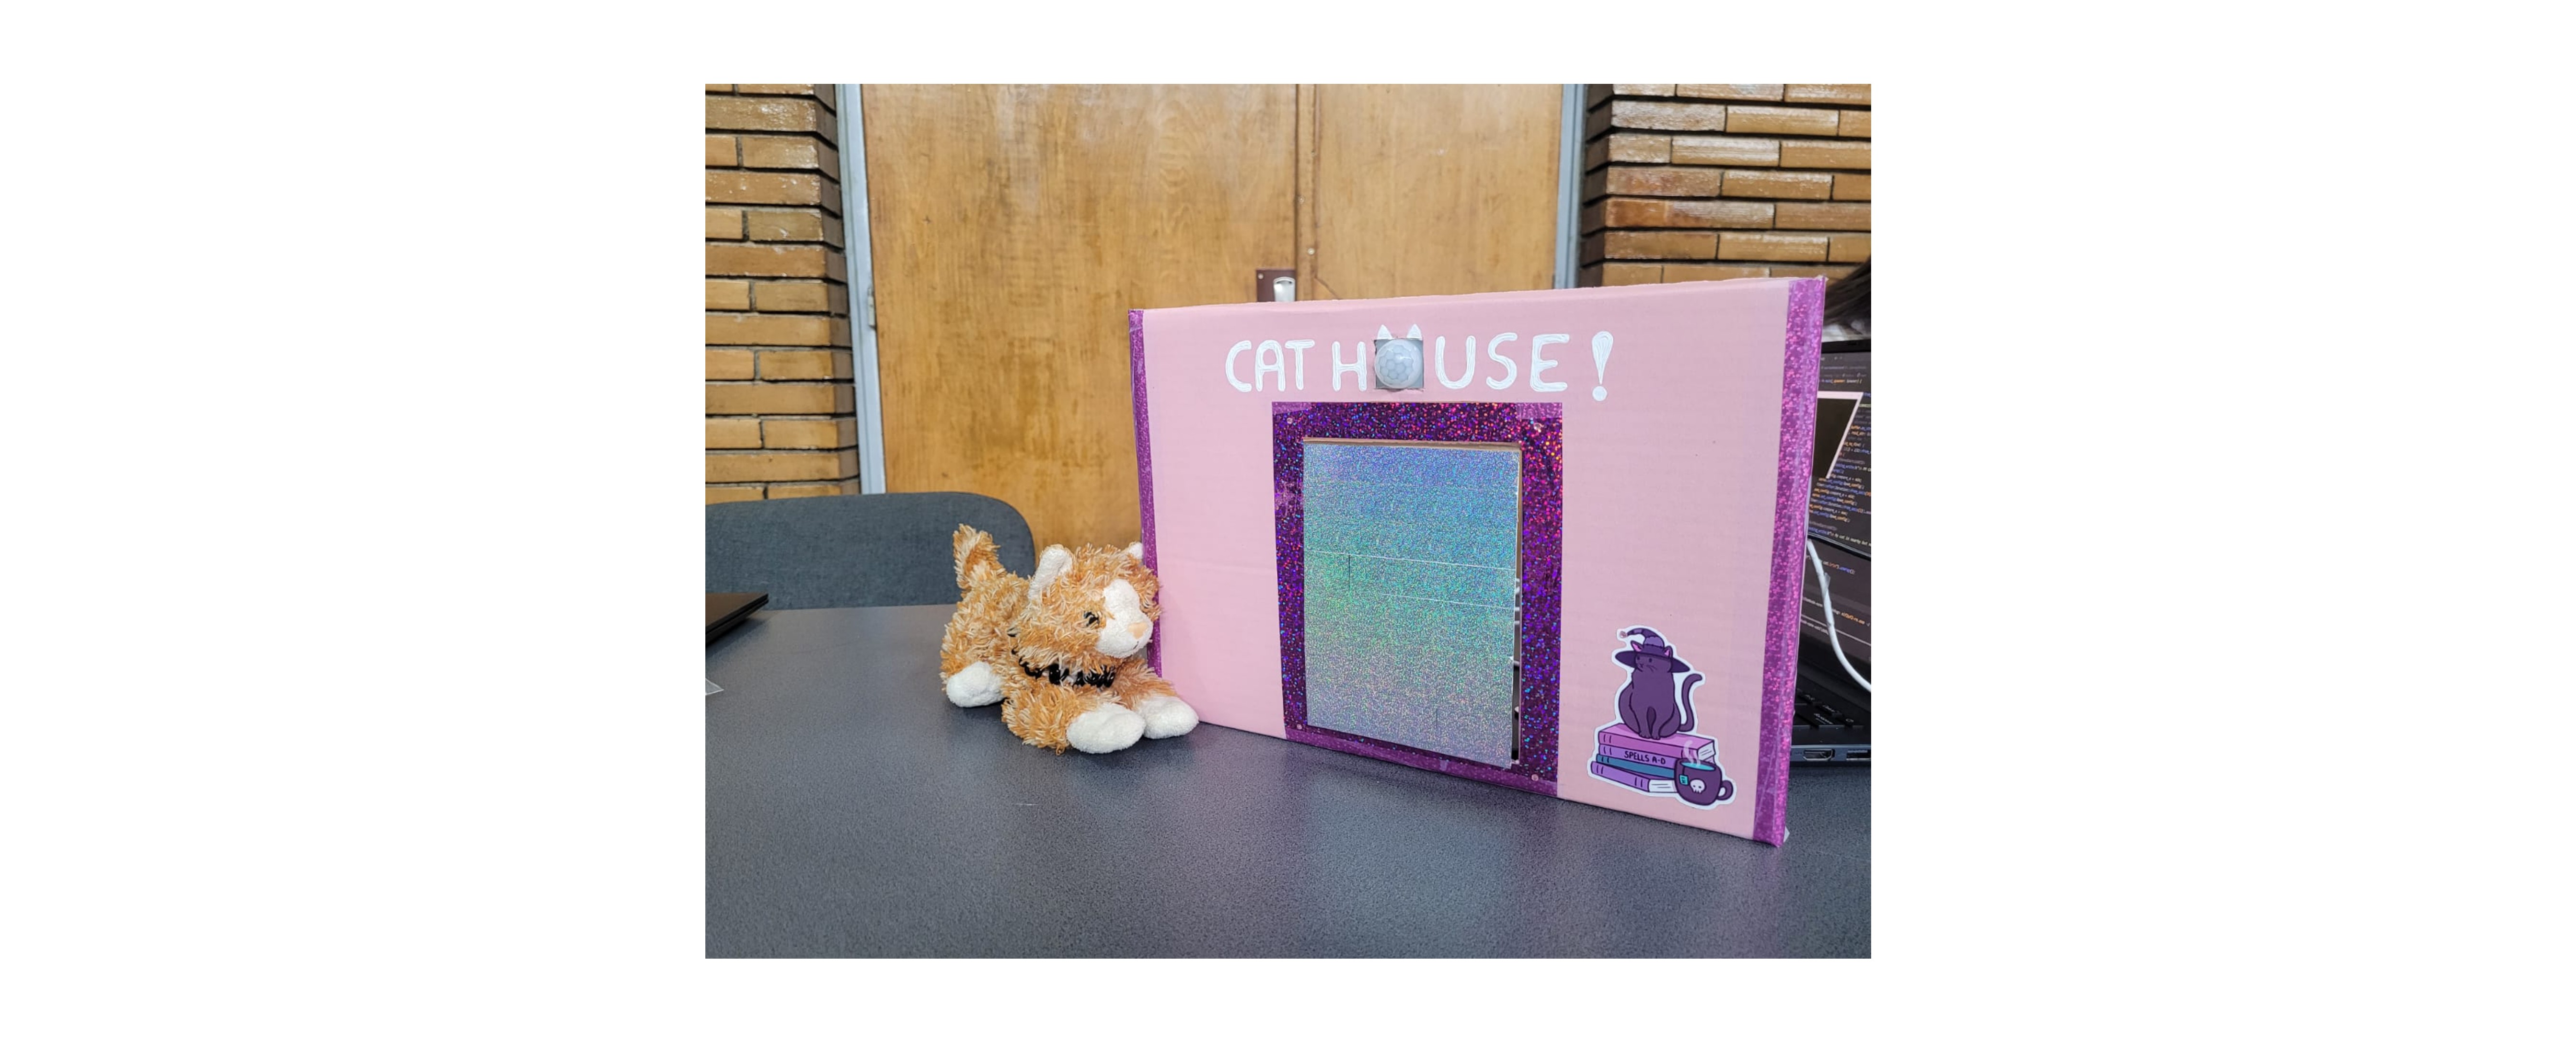
Final look from the PM Faire stand:
- Raspberry Pi Pico W: The microcontroller, coordinating all device interactions.
- NanoBeacon IN100: Worn by the cat, programmed with a unique UUID for door access.
- CR1225: 3V Lithium Coin Battery which powers the NanoBeacon on the cat's collar after it has been configured.
- CP2102 USB-to-Serial Module: Used in initial setup for programming the NanoBeacon.
- Infrared Sensor: Detects motion near the door to activate the system.
- HM-10 BLE Module: Enables Bluetooth communication to scan for the beacon on the cat.
- Servomotor: Controls the lock mechanism of the pet door, switching between locked and unlocked.
- USB Cable: Connects and powers the Raspberry Pi Pico W and the CP2102 during setup.
- Power Supply: An external battery to keep the system running independently.
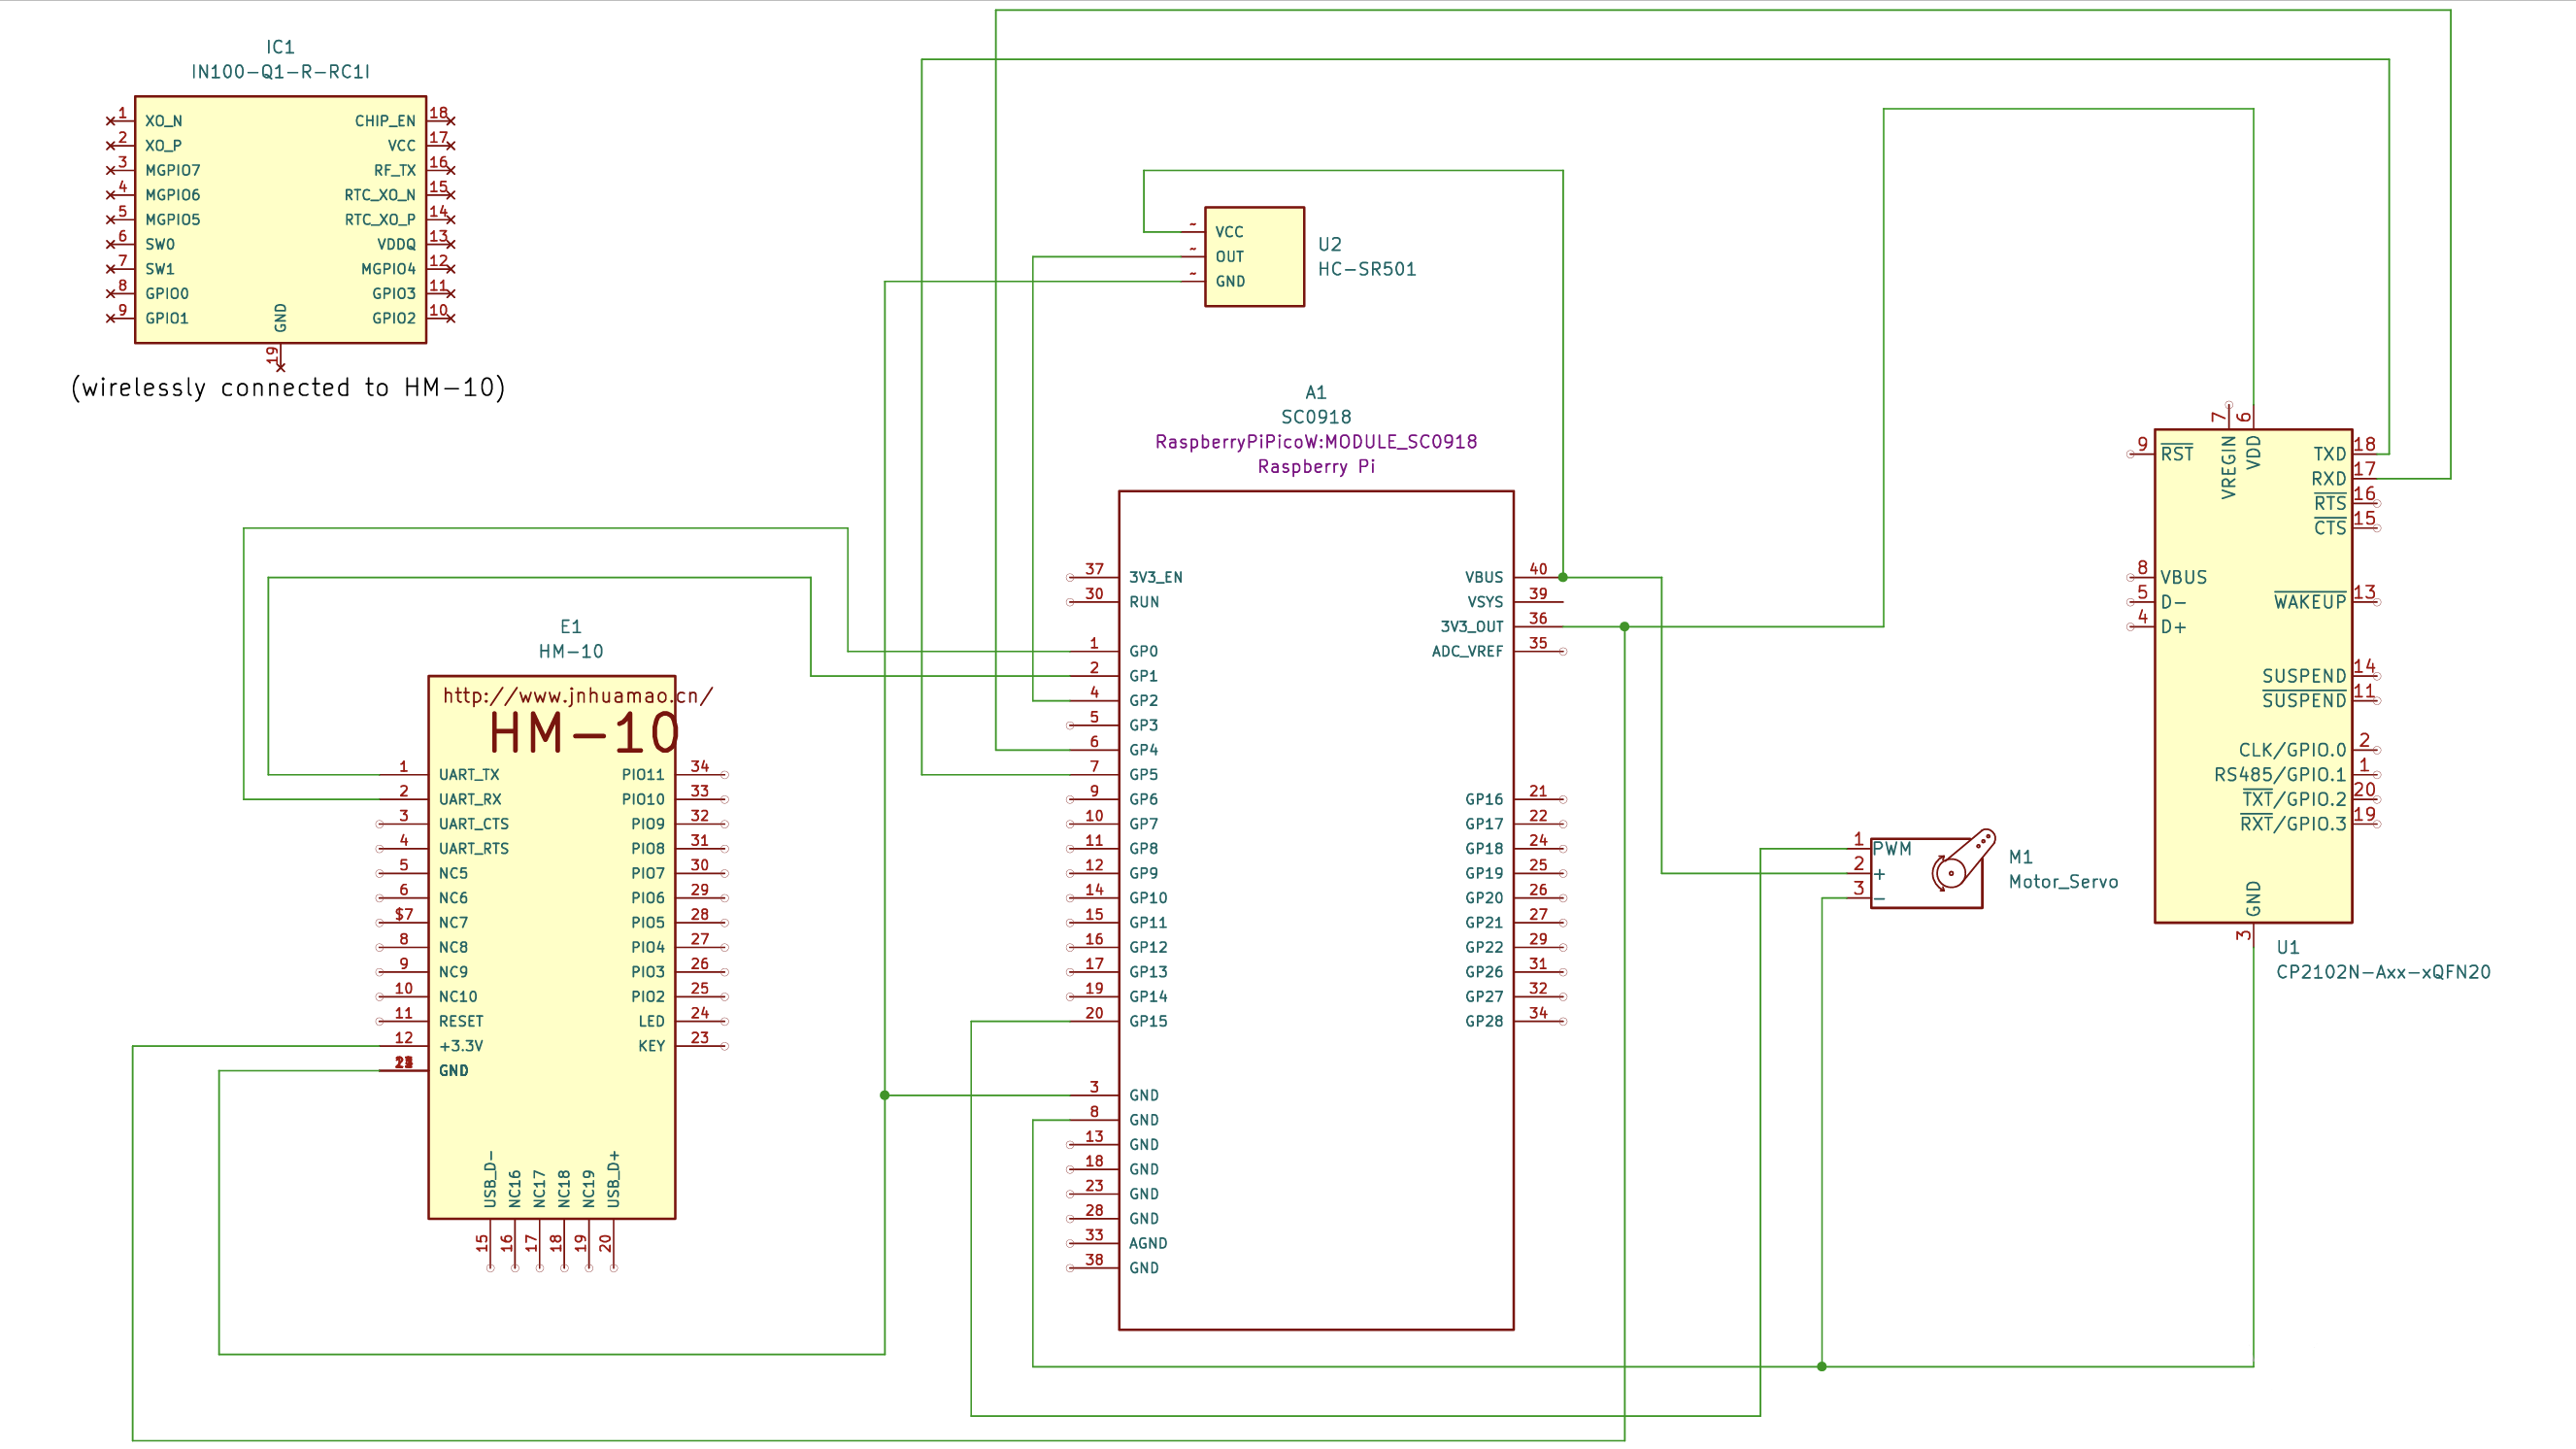
Schematics
This is the KiCad schematic:
Bill of Materials
| Device | Usage | Price |
|---|---|---|
| Raspberry Pi Pico WH | Acts as the central controller | 38.99 RON |
| HM-10 BLE Module | For scanning the NanoBeacon | 35.47 RON |
| IN100 NanoBeacon | Attached to the pet’s collar | 44 RON |
| Servomotor | Operates the door lock | 12.72 RON |
| PIR Sensor HC-SR501 | Detects motion at the door | 5.25 RON |
Software
| Library | Description | Usage |
|---|---|---|
| embassy-executor | Asynchronous executor for Rust embedded systems | Used for task scheduling and asynchronous programming |
| embassy-time | Time management library | Used for time-based operations such as delays |
| embassy-rp | Peripheral access library | Used for initializing and interacting with peripherals |
| serialport | A Rust library for working with serial ports. | Used to communicate with the HM-10 BLE module for beacon scanning and Bluetooth communication. |
| HMSoft V540 | The firmware download files for the HM-10 BLE module. | I will try to use the HM-10 HMSoft CC2541 WeChat Airsync V540 firmware upgrade file [2016-11]. |
| NanoBeacon Config tool | The tool to configure the NanoBeacon's UUID and characteristics. | I will set up the IN-100 using this and then search for the specific configurations with the HM-10 module. |