05 - Asynchronous Development
This lab will teach you the principles of asynchronous programming, and its application in Embassy.
Resources
- Bert Peters, How does async Rust work
- Omar Hiari, Sharing Data Among Tasks in Rust Embassy: Synchronization Primitives
Asynchronous functions
Up to now, during the labs, we've seen that, in order to be able to do multiple different actions "at once", we would use tasks. We would let the main function run, while also doing another action seemingly "in parallel" inside of another task.
Let's take the following example: if we want to blink an LED every second while also waiting for a button press to do something else, we would need to spawn a new task in which we would wait for the button press, while blinking the LED in the main function.
When thinking of how exactly this works, you would probably think that the task is running on a separate thread than the main function. Usually this would be the case when developing a normal computer application. Multithreading is possible, but requires a preemptive operating system. Without one, only one thread can independently run per processor core and that means that, since we are using only one core of the RP2040 (which actually has only 2), we would only be able to run one thread at a time. So how exactly does the task wait for the button press in parallel with the LED blinking?
Short answer is: it doesn't. In reality, both functions run asynchronously.
Tasks
A task in Embassy is represented by an asynchronous function. Asynchronous functions are different from normal functions, in the sense that they allow asynchronous code execution. Let's take an example from the previous lab:
#[embassy_executor::task]
async fn button_pressed(mut led: Output<'static, PIN_X>, mut button: Input<'static, PIN_X>) {
    loop {
	info!("waiting for button press");
        button.wait_for_falling_edge().await;
    }
}

#[embassy_executor::main]
async fn main(spawner: Spawner) {
    let peripherals = embassy_rp::init(Default::default());

    let button = Input::new(peripherals.PIN_X, Pull::Up);
    let led2 = Output::new(peripherals.PIN_X, Level::Low);

    spawner.spawn(button_pressed(led2, button)).unwrap();

    let mut led = Output::new(peripherals.PIN_X, Level::Low);

    loop {
        led.toggle();
        Timer::after_millis(200).await;
    }
}
In this example, we notice that both the button_pressed and main functions are declared as async, telling the compiler to treat them as asynchronous functions. Inside the main function (which is also a task, actually), we blink the LED:
loop {
    led.toggle();

    Timer::after_millis(200).await;
}
await keyword
After setting the timer, our main function would need to wait until the alarm fires after 200 ms. Instead of just waiting and blocking the current and only thread of execution, it could allow the thread to do another action in the meantime. This is where the .await keyword comes into play.
When using .await inside of an asynchronous function, we are telling a third party (called the executor, detailed later) that this action might take more time to finish, so do something else until it's ready. Basically, the execution flow of the asynchronous function function is halted exactly where .await is used, and the executor starts running another task. In our case, it would halt the main function while waiting for the alarm to go off and it could start running the code inside the button_pressed task.
loop {
    info!("waiting for button press");
    button.wait_for_falling_edge().await;
}
We can see that here, we also use the wait_for_falling_edge function asynchronously, meaning that until we get a signal that a button has been pressed, the executor can decide to do other stuff. If it has nothing else to do, it goes to sleep, until it receives a signal that either the button has been pressed, or the timer has run out. Then, it will resume execution of the function where the action has completed.
When the button is pressed the execution flow will resume inside of the button_pressed task, until it is interrupted by the next .await in that function. If the timer runs out before the button_pressed task execution reaches the next .await, the resuming of the main function will delayed until the button_pressed task .awaits.
This method of development allows our programs to run seemingly "in parallel", without the need of multiple threads. Each task voluntarily pauses its execution and passes control over to whatever other task needs it. This means that it's the task's business to allow other tasks to run while it's idly waiting for something to happen on its end.
On a preemptive operating system, it would be the scheduler's job to decide when and for how long processes get to run.
Futures
Rust has a special datatype that represents an action that will complete sometime in the future. By using .await on a Future, we are passing control to another task until the Future completes.
In the button_pressed task, the wait_for_falling_edge returns a Future, which is then .awaited.
This is a simplified version of what a Future in Rust really looks like:
enum Poll<T> {
    Pending,
    Ready(T),
}

trait Future {
   type Output;
   fn poll(&mut self) -> Poll<Self::Output>;
}
The Future has an Output associated type, that represents the type of the result that it will return once it completes. For wait_for_falling_edge(), the Output type is () (nothing).
The function poll returns a Poll type, which can either be Pending, or Ready<T> (T will be output in this case).
Let's break down what all of this means. A Future needs to be checked on, every now and then, to see what its status is. This is the job of the Executor. The executor must regularly ask the Future if it's completed, or if it needs more time before it can give a result. We can say that the Future is polled, and depending on whether it's ready to give a result or not, it gives its status as Pending or Ready. If it's still pending, it needs more time before it can return a result, so the executor moves on to poll another Future. Whenever the Future is completed, it returns Ready once polled, and the executor returns execution back to the function where the Future .awaited.
An efficient executor will not poll all tasks. Instead, tasks signal the executor that they are ready to make progress by using a Waker.
A real future in Rust looks like this:
pub trait Future {
    type Output;

    // Required method
    fn poll(self: Pin<&mut Self>, cx: &mut Context<'_>) -> Poll<Self::Output>;
}
Under the hood, the Rust compiler is actually transforming our asynchronous function into a state-machine. That is why we can only use .await inside of an async function, because it needs to be treated differently than an ordinary function in order to work asynchronously.
Asynchronous programming is widely used in web development. In JavaScript, the equivalent of a Future would be a Promise.
Read more about how async/await works in Rust here.
awaiting multiple Futures
Sometimes we need to .await several futures at the same time. Embassy provides two ways of doing this:
select- wait for severalFutures, stop as soon as one of them returns;join- wait for severalFutures until they all return
select
In some cases, we might find ourselves in the situation where we need to await multiple futures at a time. For example, we want to wait for a button press and wait for a timer to expire, and we deal with each future completion in different ways.
There is a function in Embassy that allows us to do this: select. It takes two Futures as arguments, and polls both of them to see which one completes first.
let select = select(button.wait_for_falling_edge(), Timer::after_secs(5)).await;
It returns an Either type, that looks like this:
pub enum Either<A, B> {
    First(A),
    Second(B),
}
A and B are the results of each Future, so we can just use a match on the select variable to see which Future finished first.
match select {
    First(res1) => {
        // handle case for button press
    },
    Second(res2) => {
        // handle case for alarm firing
    }
}
After selecting the first Future that completes, the other one is dropped. For instance, if the button press happens first, the timer will be stopped.
You can also use select3, select4 or select_array when dealing with more than two Futures.
join
Similarly, we can also join multiple Futures, meaning that we wait for all of them to complete before moving on.
let (res1, res2) = join(button.wait_for_falling_edge(), Timer::after_secs(5)).await;
join returns a tuple containing the results of both Futures.
Channels
Up to this point, to be able to share peripherals or data across multiple tasks, we have been using global Mutexs or passing them directly as parameters to the tasks. But there are other, more convenient ways to send data to and from tasks. Instead of having to make global, static variables that are shared by tasks, we could choose to only send the information that we need from one task to another. To achieve this, we can use channels.
Channels allow a unidirectional flow of information between two endpoints: the Sender and the Receiver. The sender sends a value through the channel, and the receiver receives this value once it is ready to do so. Until it is ready, the data will be stored inside a queue. Channels in Embassy are Multiple Producer, Multiple Consumer, which means that we can have a channel associated with multiple senders and multiple receivers.
To use a channel in Embassy, we first need to declare a static instance of the channel.
static CHANNEL: Channel<ThreadModeRawMutex, bool, 64> = Channel::new();
ThreadModeRawMutex- the type of Mutex that the Channel internally uses. It is a mutex that can safely be shared between threadsbool- the type of data that is sent through the channel64- the maximum number of values that can be stored in the channel's queue
Let's say we spawn a task task1 that runs a timer. Every second, we want to toggle an LED in the main function, based on the timer running in task1. For this, task1 would need to send a signal to the main program every time the 1 second alarm has fired, meaning the task and the main program would share the channel. task1 would send over the channel, and main would receive.
Inside task1, we would just set a timer and wait until it fires. After it fires, we send a signal through the channel, to indicate that 1 second has elapsed.
#[embassy_executor::task]
async fn task1() {
    loop {
        Timer::after_secs(1).await;
        CHANNEL.send(true).await;
    }
}
In the main function, we need to then wait for the signal, and once it's received, toggle the LED.
// ---- fn main() ----
loop {
    let value = CHANNEL.receive().await;
    match value {
        true => led.toggle().unwrap(),
        false => info!("We got something else")
    }
}
The reason we need all of this is because Rust doesn't allow us to mutably borrow more than once. To use a peripheral (say PWM) inside multiple tasks,
we would need to either move it inside the task entirely, or use a mutable reference to it. If we have multiple tasks, though, once we move our peripheral variable inside the first task,
we can't pass it to another task, because the value was moved inside that task completely. And if we wanted to pass it as a mutable reference instead, we would quickly realize that Rust
doesn't allow multiple mutable references at once, to avoid concurrent modifications. So this is why we need to either declare a global, static Mutex that any task can access, to ensure
that the value cannot be modified concurrently by two different tasks, or use channels and keep the peripheral inside the main function.
To better understand the concepts of ownership and borrowing in Rust, take a look at chapter 4 of the Rust Book.
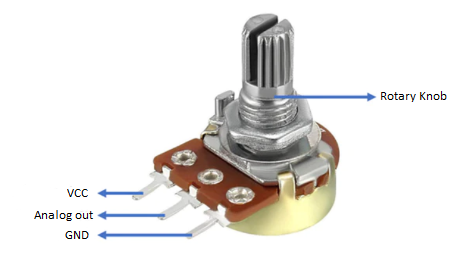
Potentiometer
A potentiometer is a three-terminal resistor with a sliding or rotating contact that forms an adjustable voltage divider. If only two terminals are used, one end and the wiper, it acts as a variable resistor or rheostat. A volume knob on a speaker is a potentiometer, for instance.
Exercises
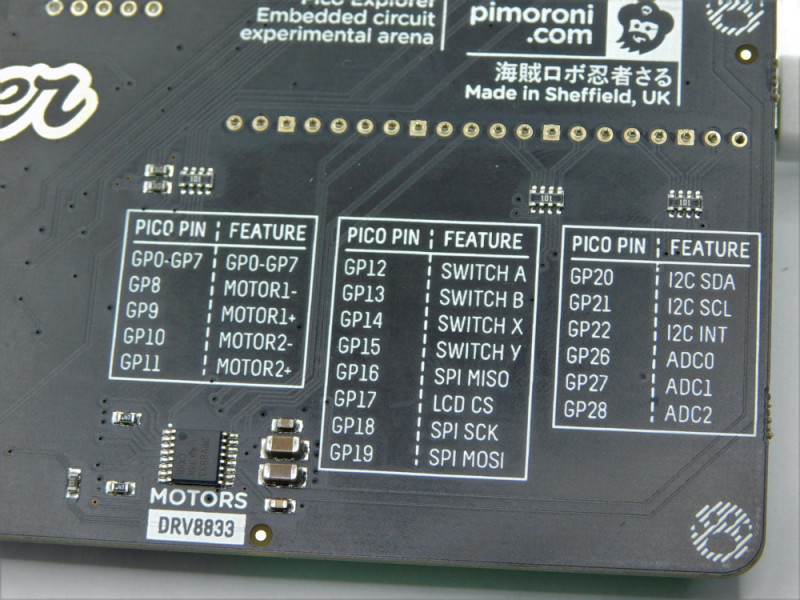
- Connect an LED to GP0, an RGB LED to GP1, GP2, GP5 and a potentiometer to ADC0. Use Kicad to draw the schematic. (1p)
- Change the monochromatic LED's intensity, using button A (SW_A) and button B(SW_B) on the Pico Explorer. Button A will increase the intensity, and button B will decrease it. (2p)
- Use PWM to control the intensity.
- Create two tasks, one for button A, one for button B. Use a channel to send commands from each button task to the main task.
- Control the RGB LED's color with buttons A, B, X and Y on the Pico Explorer. (2p)
- Button A -> RGB = Red
- Button B -> RGB = Green
- Button X -> RGB = Blue
- Button Y -> RGB = Led Off
Use a separate task for each button. When a button press is detected, a command will be sent to the main task, and the main task will set the RGB LED's color according to that command.
When building Rust software in debug mode, which is what cargo build does, Rust will panic if mathematical operations underflow or overflow. This means that:
let v = 10u8;
v -= 12;
will panic. To avoid this, you can use the wrapping_ and saturating_ functions:
let v = 10u8;
// this will store 0 in v
v = v.saturating_sub(12);
:::
- In addition to the four buttons, control the RGB LED's intensity with the potentiometer. (3p)
You will need another task in which you sample the ADC and send the values over a channel. You could do this in one of two ways:
- Use a single channel for both changing the color and the intensity of the LED. Button tasks and the potentiometer task will send over the same channel. For this, you will need to change the type of data that is sent over the channel to encapsulate both types of commands. For example, you could use an enum like this:
enum LedCommand {
    ChangeColor(Option<LedColor>),
    ChangeIntensity(u16)
}
- Use two separate channels, one for sending the color command (which contains the LedColor), and one for sending the intensity. You can
awaitboth channelreceive()futures inside of aselectto see which command is received first, and handle it. Example:
let select = select(COLOR_CHANNEL.receive(), INTENSITY_CHANNEL.receive()).await;
match select {
    First(color) => {
        // ...
    },
    Second(intensity) => {
        // ...
    }
}
- Print to the screen of the Pico Explorer the color of the RGB LED and its intensity. Use the SPI screen driver provided in the lab skeleton. (2p)
To write to the screen, use this example:
let mut text = String::<64>::new();
write!(text, "Screen print: ", led_color).unwrap(); // led_color must be defined first

Text::new(&text, Point::new(40, 110), style)
    .draw(&mut display)
    .unwrap();

// Small delay for yielding
Timer::after_millis(1).await;